Pages

Banner 468

Showing posts with label CCNA Tutorial. Show all posts
Friday, 24 January 2014

How to setup Inbound/Outbound firewall

0 comments
 

How to setup Inbound/Outbound firewall rules on NETGEAR Modem router/gateways

Symptoms: 
  • Cannot connect or access LAN devices or applications from the Internet (i.e.: FTP server, HTTP server, Podcast server, etc...)
  • Cannot play online games through NETGEAR Modem Routers
  • The NETGEAR firewall prevented certain applications to work correctly over the Internet
Resolutions:

By default, the NETGEAR Firewall rules will block and prevent any unauthorized access to your Local Area Network (LAN).  Remote access to the LAN devices or applications will only be possible after an inbound or outbound firewall rule is added to the router/gateway.  Inbound firewall rules are set of rules that would allow or permit access to the LAN services from the Internet -- the default rule blocks all incoming service requests.  On the other hand, Outbound firewall rules would prevent or deny access to the Internet from the LAN devices -- the default rule allows all outgoing traffic. 
The steps below will show you how to configure inbound/outbound firewall rules:
1. Open Internet browser and access http://192.168.0.1 or http://www.routerlogin.com.  
2. Enter admin for username and password for password. If you have changed the default password, please enter your customized password when prompted.
3. On the left panel under Security (Content Filtering, for older devices) , click Firewall Rules
4. Click the Add button under the type of rule (Outbound or Inbound) that you would like to add.
5. Select the desired Service from the list.  If necessary, you can define a customized service.  To add a new customized Service, follow these steps:
    1. On the left panel, under Security (Content Filtering for older models), click Services.
    2. Click the Add Custom Service button.
    3. Create a Name for the new service
    4. Select the Type of protocol that the service will be using.
    5. Enter the Starting port and Ending port
    6. Click Apply to finish adding the new custom service.
6. Under Action, select the appropriate action for packets covered for this rule.
  • Note: To define the Schedule used in these selections, use the "Schedule" option listed on the Security or Content Filteringsection.
7. Under the Send to LAN server field, enter the IP address of the PC or Server on your LAN which will receive the inbound or outbound traffic covered by this rule.
8. Select an option for WAN Users. This setting determine which packets are covered by the rule, based on their source (WAN) IP address. Here are the options:
    • Any - All IP addresses are covered by this rule
    • Address range - If this option is selected, you must enter the "Start" and "Finish" fields
    • Single address - Enter the required address in the "Start" fields.
9. Select an option under Log. This determines whether packets covered by this rule are logged. Select the desired action.
    • Always - always log traffic considered by this rule, whether it matches or not. (This is useful when debugging your rules.)
    • Never - never log traffic considered by this rule, whether it matches or not.
    • Match - Log traffic only it matches this rule. (The action is determined by this rule.)
    • Not Match - Log traffic which is considered by this rule, but does not match (The action is NOT determined by this rule.)
10. Click on Apply button.

This applies to:
     > Netgear MBR624GU, DGND3300, DGN2000, DG834G and DG834N.


Readmore...
Wednesday, 22 January 2014

Device Server Technology

0 comments
 
Device networking starts with a device server, which allows almost any device with serial connectivity to connect to Ethernet networks quickly and cost-effectively. These products include all of the elements needed for device networking and because of their scalability; they do not require a server or gateway.
This tutorial provides an introduction to the functionality of a variety of device servers.  It will cover print servers, terminal servers and console servers, as well as embedded and external device servers.  For each of these categories, there will also be a review of specific Lantronix offerings.

An Introduction to Device Servers

A device server is characterized by a minimal operating architecture that requires no per seat network operating system license, and client access that is independent of any operating system or proprietary protocol. In addition the device server is a "closed box," delivering extreme ease of installation, minimal maintenance, and can be managed by the client remotely via a web browser.
By virtue of its independent operating system, protocol independence, small size and flexibility, device servers are able to meet the demands of virtually any network-enabling application. The demand for device servers is rapidly increasing because organizations need to leverage their networking infrastructure investment across all of their resources. Many currently installed devices lack network ports or require dedicated serial connections for management -- device servers allow those devices to become connected to the network.
Device servers are currently used in a wide variety of environments in which machinery, instruments, sensors and other discrete devices generate data that was previously inaccessible through enterprise networks. They are also used for security systems, point-of-sale applications, network management and many other applications where network access to a device is required.
As device servers become more widely adopted and implemented into specialized applications, we can expect to see variations in size, mounting capabilities and enclosures. Device servers are also available as embedded devices, capable of providing instant networking support for developers of future products where connectivity will be required.
Print servers, terminal servers, remote access servers and network time servers are examples of device servers which are specialized for particular functions. Each of these types of servers has unique configuration attributes in hardware or software that help them to perform best in their particular arena.

External Device Servers

External device servers are stand-alone serial-to-wireless (802.11b) or serial-to-Ethernet device servers that can put just about any device with serial connectivity on the network in a matter of minutes so it can be managed remotely.

External Device Servers from Lantronix

Lantronix external device servers provide the ability to remotely control, monitor, diagnose and troubleshoot equipment over a network or the Internet.  By opting for a powerful external device with full network and web capabilities, companies are able to preserve their present equipment investments.   
Lantronix offers a full line of external device servers:  Ethernet or wireless, advanced encryption for maximum security, and device servers designed for commercial or heavy-duty industrial applications.
Wireless: 
Providing a whole new level of flexibility and mobility, these devices allow users to connect devices that are inaccessible via cabling.  Users can also add intelligence to their businesses by putting mobile devices, such as medical instruments or warehouse equipment, on networks.
Security:
Ideal for protecting data such as business transactions, customer information, financial records, etc., these devices provide enhanced security for networked devices.
Commercial: 
These devices enable users to network-enable their existing equipment (such as POS devices, AV equipment, medical instruments, etc.) simply and cost-effectively, without the need for special software.
Industrial: 
For heavy-duty factory applications, Lantronix offers a full complement of industrial-strength external device servers designed for use with manufacturing, assembly and factory automation equipment. All models support Modbus industrial protocols.

Embedded Device Servers

Embedded device servers integrate all the required hardware and software into a single embedded device.  They use a device’s serial port to web-enable or network-enable products quickly and easily without the complexities of extensive hardware and software integration. Embedded device servers are typically plug-and-play solutions that operate independently of a PC and usually include a wireless or Ethernet connection, operating system, an embedded web server, a full TCP/IP protocol stack, and some sort of encryption for secure communications.

Embedded Device Servers from Lantronix

Lantronix recognizes that design engineers are looking for a simple, cost-effective and reliable way to seamlessly embed network connectivity into their products.  In a fraction of the time it would take to develop a custom solution, Lantronix embedded device servers provide a variety of proven, fully integrated products.  OEMs can add full Ethernet and/or wireless connectivity to their products so they can be managed over a network or the Internet.
Module: 
These devices allow users tonetwork-enable just about any electronic device with Ethernet and/or wireless connectivity.
Board-Level: 
Users can integrate networking capabilities onto the circuit boards of equipment like factory machinery, security systems and medical devices.
Single-Chip Solutions: 
These powerful, system-on-chip solutions help users address networking issues early in the design cycle to support the most popular embedded networking technologies.

Terminal Servers

Terminal servers are used to enable terminals to transmit data to and from host computers across LANs, without requiring each terminal to have its own direct connection. And while the terminal server's existence is still justified by convenience and cost considerations, its inherent intelligence provides many more advantages. Among these is enhanced remote monitoring and control. Terminal servers that support protocols like SNMP make networks easier to manage.
Devices that are attached to a network through a server can be shared between terminals and hosts at both the local site and throughout the network. A single terminal may be connected to several hosts at the same time (in multiple concurrent sessions), and can switch between them. Terminal servers are also used to network devices that have only serial outputs. A connection between serial ports on different servers is opened, allowing data to move between the two devices.
Given its natural translation ability, a multi-protocol server can perform conversions between the protocols it knows such as LAT and TCP/IP. While server bandwidth is not adequate for large file transfers, it can easily handle host-to-host inquiry/response applications, electronic mailbox checking, etc. In addition, it is far more economical than the alternatives -- acquiring expensive host software and special-purpose converters. Multiport device and print servers give users greater flexibility in configuring and managing their networks.
Whether it is moving printers and other peripherals from one network to another, expanding the dimensions of interoperability or preparing for growth, terminal servers can fulfill these requirements without major rewiring. Today, terminal servers offer a full range of functionality, ranging from 8 to 32 ports, giving users the power to connect terminals, modems, servers and virtually any serial device for remote access over IP networks.

Print Servers

Print servers enable printers to be shared by other users on the network. Supporting either parallel and/or serial interfaces, a print server accepts print jobs from any person on the network using supported protocols and manages those jobs on each appropriate printer.
The earliest print servers were external devices, which supported printing via parallel or serial ports on the device. Typically, only one or two protocols were supported. The latest generations of print servers support multiple protocols, have multiple parallel and serial connection options and, in some cases, are small enough to fit directly on the parallel port of the printer itself. Some printers have embedded or internal print servers. This design has an integral communication benefit between printer and print server, but lacks flexibility if the printer has physical problems.
Print servers generally do not contain a large amount of memory; printers simply store information in a queue. When the desired printer becomes available, they allow the host to transmit the data to the appropriate printer port on the server. The print server can then simply queue and print each job in the order in which print requests are received, regardless of protocol used or the size of the job.
Terminal / Printer Server Example

Device Server Technology in the Data Center

The IT/data center is considered the pulse of any modern business.  Remote management enables users to monitor and manage global networks, systems and IT equipment from anywhere and at any time.  Device servers play a major role in allowing for the remote capabilities and flexibility required for businesses to maximize personnel resources and technology ROI.

Console Servers

Console servers provide the flexibility of both standard and emergency remote access via attachment to the network or to a modem. Remote console management serves as a valuable tool to help maximize system uptime and system operating costs.
Secure console servers provide familiar tools to leverage the console or emergency management port built into most serial devices, including servers, switches, routers, telecom equipment - anything in a rack - even if the network is down. They also supply complete in-band and out-of-band local and remote management for the data center with tools such as telnet and SSH that help manage the performance and availability of critical business information systems.

Console Management Solutions from Lantronix

Lantronix provides complete in-band and out-of-band local and remote management solutions for the data center. Lantronix secure console management products give IT managers unsurpassed ability to securely and remotely manage serial devices, including servers, switches, routers, telecom equipment - anything in a rack - even if the network is down.

Conclusion

The ability to manage virtually any electronic device over a network or the Internet is changing the way the world works and does business. With the ability to remotely manage, monitor, diagnose and control equipment, a new level of functionality is added to networking — providing business with increased intelligence and efficiency.  Lantronix leads the way in developing new network intelligence and has been a tireless pioneer in machine-to-machine (M2M) communication technology.
We hope this introduction to networking has been helpful and informative. This tutorial was meant to be an overview and not a comprehensive guide that explains everything there is to know about planning, installing, administering and troubleshooting a network. There are many Internet websites, books and magazines available that explain all aspects of computer networks, from LANs to WANs, network hardware to running cable. To learn about these subjects in greater detail, check your local bookstore, software retailer or newsstand for more information.

Readmore...
Tuesday, 19 November 2013

Tips to Boost Wireless Speed, Range, and Reliability

0 comments
 
Wireless internet is awesome…When it’s fast, reliable, and has wide coverage that is.  When the signal keeps dropping or the speed is so slow you might as well be on dial-up, it’s another story. Frustrating might be a mild description of the emotions a cruddy wireless network can evoke.
Thankfully, there are a number of easy, and completely free, tricks to get your WiFi working like a champ.  We wrote this guide so even those “technologically challenged” among us can run through it in a few minutes.
But, before you dive in, you will need to login to your router using a web browser. Lucky for you, we’ve got a simple guide called “How to Login to a Wireless Router” that will lead you through the process.
Once signed into the router, you might have to click around a little bit to find the settings we need to adjust. Generally, you are looking for some sort of “wireless settings” or “advanced wireless settings” page. Don’t be afraid to poke around a little bit. We’ll let you in on a little secret. The all-knowing and oft nerdy IT people actually aren’t all-knowing. Quite often they have no idea how to solve a problem. However, they are willing to click around until they find the setting they are looking for.
Most computer wary people just need a confidence boost. Need some help getting the gumption to tackle this task? No problem. Here’s 13 things to make your day better. Okay, now we’re ready to kick some wireless butt.
Note: This tutorial assumes you already have a wireless router setup and that the computer you are using is connected to that network (hardwired connected is preferable). It is also written specifically for 802.11B/G/N devices. All of the tips are also applicable to 802.11AC, but the instructions may be slightly different.

1. Optimize wireless router location

Probably the easiest and most important improvement you can make is physically moving your router. Try a centralized location in your home. If it’s a two story home with a basement, put the router in the middle of the home on the first floor. Keep it away from devices that can interfere with a wireless signal, like a microwave or cordless phone. Also keep it away from foundational walls and out of cabinets. Don’t shove it at the bottom of an AV rack stuffed with home theater equipment or in your utility room. Your ultimate goal is to maximize coverage in the home by keeping the router away from things that might block or otherwise interfere with the signal. Try out a few different locations and then walk around your home with a wireless device and see how the signal changes.
Each time you move the router, you will want to record what the signal strength is and perform a speed test. This allows you to be more precise and strategic about the process, particularly in later parts of this guide. You can test the signal strength simply by observing how many bars your device shows. For those wanting the most accurate results possible, consider downloading the program inSSIDer. It allows you to see the wireless channel and signal strength of all of the wireless networks within range.

2. Hard wire as much as possible

This is a pretty simple suggestion. The fewer devices on a wireless network, the faster the network is likely to run. Not to mention that a hardwired connection is faster and more reliable in the first place. This process may involve moving some of your equipment around so you can get an Ethernet cable to it from the router. If you know your way around CAT cabling, you might check to see if the phone lines in your home are wired using CAT 5 or CAT 6. If they are, you could use the phone cables throughout your home to hard wire devices (heck, even CAT 3 can be made to work). You might also consider using an Ethernet over powerline adapter explained in our article on how to add wireless to hardwired devices.

3. Disable old wireless protocols

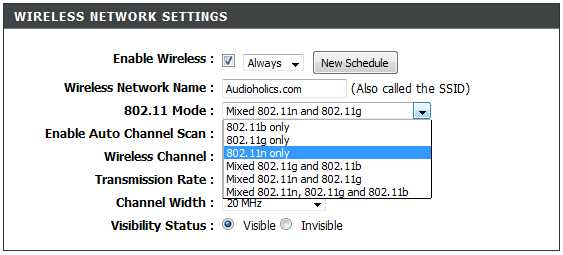
Even though your fancy new router may be super-fast with 802.11n (or even 802.11ac), as soon as a device connects using an older protocol, say, 802.11g, the entire network slows down. The fix to this problem is to set the router to only broadcast newer wireless modes. For your reference, the speeds from slowest to fastest are: b, g, n, ac. Notice in the picture below that you can select which modes you want the router to work with.

wireless protocal g/n 
Disable Old Wireless Modes
If all of the devices on your network support wireless n (802.11ac is faster, but most devices don’t support it yet), then select “802.11n only”. Unfortunately, this will kick any devices not compatible with wireless n off of the network. You can either:
A) stop using the older devices.
B) upgrade their wireless cards, if possible.
C) hardwire them to the router instead of connecting wirelessly.
D) select a mixed operation mode (like 802.11g + n), or E) purchase a dual band router.
Dual band routers are like having two routers built into one (close enough, anyway). They can broadcast two separate wireless networks simultaneously. This means that you could setup a wireless g network for you older devices, and a wireless n network for newer devices. This allows the older devices to connect to WiFi without slowing down newer devices. But don’t get too excited yet. Dual band routers operate by sending out the two wireless networks on different frequencies, one at 2.4Ghz, the other at 5Ghz. Many new wireless devices still do not work on a 5Ghz network, even if the device is 802.11n compatible. Additionally, 5Ghz wireless networks have poorer range than 2.4Ghz networks. You will want to do some research to find out which devices of yours actually support 5Ghz before investing in a dual band router. With that said, if you are planning on buying a new router anyway, go with a dual band router.

4. Use WPA2 security only

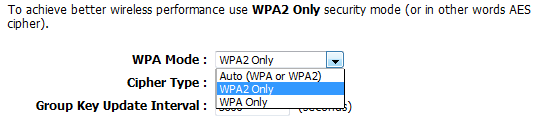
WEP encryption used to be the standard when it came to wireless security. However, now it’s not only a poor form of protection, but it can limit the speed of your network. The same goes for the more modern WPA standard. If possible, you should limit your router to only work with WPA2 encryption.
wpa2 security only
Wireless Encryption Settings

5. Change the wireless channel

You’re certainly not the only person on the block with wireless internet and routers only operate on a limited number of channels. Multiple routers operating on the same channel can cause all sorts of issues, including dropping a wireless signal all together.
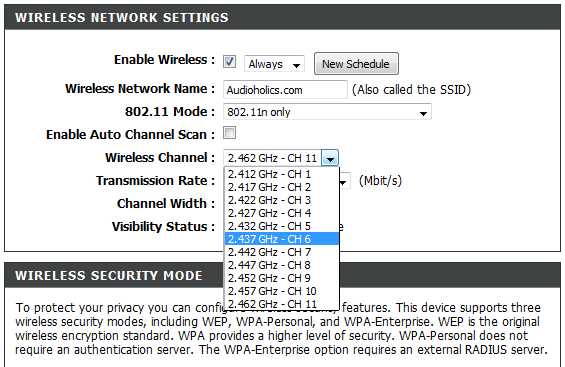
First, go to an area you normally have wireless problems. If there aren’t any real problem areas, just move a few rooms away from the router.  Before changing anything, test the signal strength and speed, like you did when determining the best location for the router. This gives us a baseline and allows us to gauge the effects of any change we make.
wireless channel
Wireless Channel Setting
Most routers set the channel to “auto” by default. Find the channel setting in the router menu, and select the lowest option (CH 1 for 2.4gHz networks), then go back and check the signal strength and speed again. Repeat this process with a few different channels. I typically only test the lowest, middle, and highest channels. Once you have found the channel that gives you the best performance, select it and save the settings.

6. Change channel width

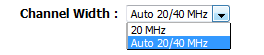
As wireless protocols have advanced, one of the ways they have increased speed is by operating using wider wireless channels. Wireless n routers need to use a 40Mhz channel width in order to achieve maximum speed. Most routers come with 20MHz as the default width, this is in an attempt to avoid interference. So, there is a potential for this change to negatively affect some users. If you start to notice issues, switch back to a 20Mhz operation. Also note that this isn’t really for increasing how fast you browse the internet, this change is more likely to be evident when streaming/transferring files between devices on your network.
Simply find the “Channel Width” setting in your router’s setting and change it to “Auto 20/40MHz”.
wireless channel width
Channel Width

7. Use your DIY skillsDIY Antenna - courtesy of Lifehacker.com

If all of the by-the-book solutions fail, then think outside the book (or box). One of the most common DIY methods for creating a killer wireless network is to upgrade the firmware of your router to a version that allows you to boost output. The most common router used for this in an older version of the Linksys WRT54G, and the firmware is called “Tomato”. Lifehacker actually has a pretty good tutorial on the entire process. Keep in mind that not all routers are compatible with alternate firmware.
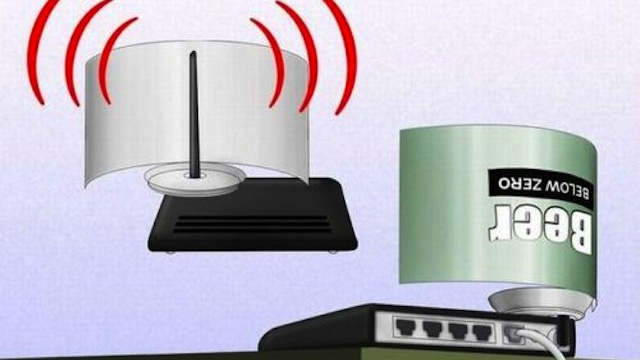
A second DIY option is to modify the antennae on the router. This is most easily done on routers with visible external antennae. If the original antennae can be unscrewed, purchase larger antennae and install them in place of the default set. Another option is to cut up a pop can or aluminum foil and direct the antenna signal in one direction, much like a satellite dish.

Conclusion

Following these 7 steps should allow you to get the most out of your wireless network. In some cases, you will notice huge benefits. For other people, who already have a solid network or don’t perform any bandwidth intensive tasks, the benefits might be more subtle. Either way, these tips should be considered best practices for setting up any wireless network.

Readmore...
Wednesday, 13 November 2013

Wireless Tutorial (CCNA)

0 comments
 

In this article we will discuss about Wireless technologies mentioned in CCNA.
Wireless LAN (WLAN) is very popular nowadays. Maybe you have ever used some wireless applications on your laptop or cellphone. Wireless LANs enable users to communicate without the need of cable. Below is an example of a simple WLAN:
Wireless_Applications.jpg
Each WLAN network needs a wireless Access Point (AP) to transmit and receive data from users. Unlike a wired network which operates at full-duplex (send and receive at the same time), a wireless network operates at half-duplex so sometimes an AP is referred as a Wireless Hub.

The major difference between wired LAN and WLAN is WLAN transmits data by radiating energy waves, called radio waves, instead of transmitting electrical signals over a cable.
Also, WLAN uses CSMA/CA (Carrier Sense Multiple Access with Collision Avoidance) instead of CSMA/CD for media access. WLAN can’t use CSMA/CD as a sending device can’t transmit and receive data at the same time. CSMA/CA operates as follows:
+ Listen to ensure the media is free. If it is free, set a random time before sending data
+ When the random time has passed, listen again. If the media is free, send the data. If not, set another random time again
+ Wait for an acknowledgment that data has been sent successfully
+ If no acknowledgment is received, resend the data
IEEE 802.11 standards:
Nowadays there are three organizations influencing WLAN standards. They are:
+ ITU-R: is responsible for allocation of the RF bands
+ IEEE: specifies how RF is modulated to transfer data
+ Wi-Fi Alliance: improves the interoperability of wireless products among vendors
But the most popular type of wireless LAN today is based on the IEEE 802.11 standard, which is known informally as Wi-Fi.
* 802.11a: operates in the 5.7 GHz ISM band. Maximum transmission speed is 54Mbps and approximate wireless range is 25-75 feet indoors.
* 802.11b: operates in the 2.4 GHz ISM band. Maximum transmission speed is 11Mbps and approximate wireless range is 100-200 feet indoors.
* 802/11g: operates in the 2.4 GHz ISM band. Maximum transmission speed is 54Mbps and approximate wireless range is 100-200 feet indoors.
ISM Band: The ISM (Industrial, Scientific and Medical) band, which is controlled by the FCC in the US, generally requires licensing for various spectrum use. To accommodate wireless LAN’s, the FCC has set aside bandwidth for unlicensed use including the 2.4Ghz spectrum where many WLAN products operate.
Wi-Fi: stands for Wireless Fidelity and is used to define any of the IEEE 802.11 wireless standards. The term Wi-Fi was created by the Wireless Ethernet Compatibility Alliance (WECA). Products certified as Wi-Fi compliant are interoperable with each other even if they are made by different manufacturers.
Access points can support several or all of the three most popular IEEE WLAN standards including 802.11a, 802.11b and 802.11g.
WLAN Modes:
WLAN has two basic modes of operation:
* Ad-hoc mode: In this mode devices send data directly to each other without an AP.
Wireless_Ad-hoc_mode.jpg
* Infrastructure mode: Connect to a wired LAN, supports two modes (service sets):
+ Basic Service Set (BSS): uses only a single AP to create a WLAN
+ Extended Service Set (ESS): uses more than one AP to create a WLAN, allows roaming in a larger area than a single AP. Usually there is an overlapped area between two APs to support roaming. The overlapped area should be more than 10% (from 10% to 15%) to allow users moving between two APs without losing their connections (called roaming). The two adjacent APs should use non-overlapping channels to avoid interference. The most popular non-overlapping channels are channels 1, 6 and 11 (will be explained later).
Wireless_Infrastructure_mode.jpg
Roaming: The ability to use a wireless device and be able to move from one access point’s range to another without losing the connection.
When configuring ESS, each of the APs should be configured with the same Service Set Identifier (SSID) to support roaming function. SSID is the unique name shared among all devices on the same wireless network. In public places, SSID is set on the AP and broadcasts to all the wireless devices in range. SSIDs are case sensitive text strings and have a maximum length of 32 characters. SSID is also the minimum requirement for a WLAN to operate. In most Linksys APs (a product of Cisco), the default SSID is “linksys”.
In the next part we will discuss about Wireless Encoding, popular Wireless Security Standard and some sources of wireless interference.
Wireless Encoding
When a wireless device sends data, there are some ways to encode the radio signal including frequency, amplitude & phase.
Frequency Hopping Spread Spectrum(FHSS): uses all frequencies in the band, hopping to different ones after fixed time intervals. Of course the next frequency must be predetermined by the transmitter and receiver.
Frequency_Hopping_Spread_Spectrum_FHSS.jpg
The main idea of this method is signals sent on different frequencies will be received at different levels of quality. By hopping to different frequencies, signals will be greatly improved the possibility that most of it will get through. For example, suppose there is another device using the 150-250 kHz range. If our device transmits in this range then the signals will be significantly interfered. By hopping at different frequencies, there is only a small interference while transmitting and it is acceptable.
Direct Sequence Spread Spectrum (DSSS): This method transmits the signal over a wider frequency band than required by multiplying the original user data with a pseudo random spreading code. The result is a wide-band signal which is very “durable” to noise. Even some bits in this signal are damaged during transmission, some statistical techniques can recover the original data without the need for retransmission.
Note: Spread spectrum here means the bandwidth used to transfer data is much wider than the bandwidth needs to transfer that data.
Traditional communication systems use narrowband signal to transfer data because the required bandwidth is minimum but the signal must have high power to cope with noise. Spread Spectrum does the opposite way when transmitting the signal with much lower power level (can transmit below the noise level) but with much wider bandwidth. Even if the noise affects some parts of the signal, the receiver can easily recover the original data with some algorithms.
wireless_Spread_Spectrum_Signal.jpg
Now you understand the basic concept of DSSS. Let’s discuss about the use of DSS in the 2.4 GHz unlicensed band.
The 2.4 GHz band has a bandwidth of 82 MHz, with a range from 2.402 GHz to 2.483 GHz. In the USA, this band has 11 different overlapping DSSS channels while in some other countries it can have up to 14 channels. Channels 1, 6 and 11 have least interference with each other so they are preferred over other channels.
wireless_2_4_GHz_band.png
Orthogonal Division Multiplexing (OFDM): encodes a single transmission into multiple sub-carriers to save bandwidth. OFDM selects channels that overlap but do not interfere with each other by selecting the frequencies of the subcarriers so that at each subcarrier frequency, all other subcarriers do not contribute to overall waveform.
In the picture below, notice that only the peaks of each subcarrier carry data. At the peak of each of the subcarriers, the other two subcarriers have zero amplitude.
wireless_OFDM.jpg
Below is a summary of the encoding classes which are used popularly in WLAN.
Encoding Used by
FHSS The original 802.11 WLAN standards used FHSS, but the current standards (802.11a, 802.11b, and 802.11g) do not
DSSS 802.11b
OFDM 802.11a, 802.11g, 802.11n
WLAN Security Standards
Security is one of the most concerns of people deploying a WLAN so we should grasp them.
Wired Equivalent Privacy (WEP)
WEP is the original security protocol defined in the 802.11b standard so it is very weak comparing to newer security protocols nowadays.
WEP is based on the RC4 encryption algorithm, with a secret key of 40 bits or 104 bits being combined with a 24-bit Initialisation Vector (IV) to encrypt the data (so sometimes you will hear “64-bit” or “128-bit” WEP key). But RC4 in WEP has been found to have weak keys and can be cracked easily within minutes so it is not popular nowadays.
The weak points of WEP is the IV is too small and the secret key is static (the same key is used for both encryption and decryption in the whole communication and never expires).
Wi-Fi Protected Access (WPA)
In 2003, the Wi-Fi Alliance developed WPA to address WEP’s weaknesses. Perhaps one of the most important improvements of WPA is the Temporal Key Integrity Protocol (TKIP) encryption, which changes the encryption key dynamically for each data transmission. While still utilizing RC4 encryption, TKIP utilizes a temporal encryption key that is regularly renewed, making it more difficult for a key to be stolen. In addition, data integrity was improved through the use of the more robust hashing mechanism, the Michael Message Integrity Check (MMIC).
In general, WPA still uses RC4 encryption which is considered an insecure algorithm so many people viewed WPA as a temporary solution for a new security standard to be released (WPA2).
Wi-Fi Protected Access 2 (WPA2)
In 2004, the Wi-Fi Alliance updated the WPA specification by replacing the RC4 encryption algorithm with Advanced Encryption Standard-Counter with CBC-MAC (AES-CCMP), calling the new standard WPA2. AES is much stronger than the RC4 encryption but it requires modern hardware.
Standard Key Distribution Encryption
WEP Static Pre-Shared Weak
WPA Dynamic TKIP
WPA2 Both (Static & Dynamic) AES
Wireless Interference
The 2.4 GHz & 5 GHz spectrum bands are unlicensed so many applications and devices operate on it, which cause interference. Below is a quick view of the devices operating in these bands:
+ Cordless phones: operate on 3 frequencies, 900 MHz, 2.4 GHz, and 5 GHz. As you can realize, 2.4 GHz and 5 GHz are the frequency bands of 802.11b/g and 802.11a wireless LANs.
Most of the cordless phones nowadays operate in 2.4 GHz band and they use frequency hopping spread spectrum (FHSS) technology. As explained above, FHSS uses all frequencies in the the entire 2.4 GHz spectrum while 802.11b/g uses DSSS which operates in about 1/3 of the 2.4 GHz band (1 channel) so the use of the cordless phones can cause significant interference to your WLAN.
wireless_cordless_phone.jpg
An example of cordless phone
+ Bluetooth: same as cordless phone, Bluetooth devices also operate in the 2.4 GHz band with FHSS technology. Fortunately, Bluetooth does not cause as much trouble as cordless phone because it usually transfers data in a short time (for example you copy some files from your laptop to your cellphone via Bluetooth) within short range. Moreover, from version 1.2 Bluetooth defined the adaptive frequency hopping (AFH) algorithm. This algorithm allows Bluetooth devices to periodically listen and mark channels as good, bad, or unknown so it helps reduce the interference with our WLAN.
+ Microwaves (mostly from oven): do not transmit data but emit high RF power and heating energy. The magnetron tubes used in the microwave ovens radiate a continuous-wave-like at frequencies close to 2.45 GHz (the center burst frequency is around 2.45 – 2.46 GHz) so they can interfere with the WLAN.
+ Antenna: There are a number of 2.4 GHz antennas on the market today so they can interfere with your wireless network.
+ Metal materials or materials that conduct electricity deflect Wi-Fi signals and create blind spots in your coverage. Some of examples are metal siding and decorative metal plates.
+ Game controller, Digital Video Monitor, Wireless Video Camera, Wireless USB may also operate at 2.4 GHz and cause interference too.

Readmore...
Wednesday, 2 October 2013

How to Configure WDS Bridging

0 comments
 
uitable for: N750 Wireless Dual Band Routers, N600 Wireless Dual Band Routers
A Wireless Distribution System (WDS) is a system that enables the wireless interconnection of access points in an IEEE 802.11 network. It allows a wireless network to be expanded using multiple access points without the need for a wired backbone to link them, as is traditionally required. For more information about WDS, . The following chart is an example of WDS bridging.
 
Note:  
1.     LAN IP of extended router should be different but in the same subnet of the root router;
2.     The DHCP Server on extended router should be disabled;
3.     WDS bridging only requires the WDS setting on either the root router or the extended router, on either 2.4GHz or 5GHz; NO need to setup on both side or both band.
 
Please follow this guide to setup the WDS bridging:
Step 1:
Open the web browser and type in http://tplinklogin.net or the IP of the router (Default it is 192.168.0.1 / 192.168.1.1) to login the Web Management Page of the extended router. The username and password are both "admin". If you are not sure about how to do this, please click here.
 
Step 2:
Go to Wireless 2.4GHz -> Wireless Settings. Check Enable WDS Bridging. Then the page will show like below.
Note: Here we use 2.4GHz wireless network as an example, if you want to WDS bridging the 5GHz wireless network, please go to Wireless 5GHz accordingly.
 
Step 3:
Click Survey. On the pop-up window, find the SSID of your root router and click Connect.
 
Step 4:
The root router’s SSID and BSSID have been filled automatically. Then please configure the security settings (Key type and Password) to match the ones on the root router.
 
Click Save button,  then a window will pop out to inform you to change the channel. Click OK, it will change automatically. Please do NOT reboot the router.
 
Step 5:
Go to DHCP-> DHCP Settings page. Select Disable DHCP Server, and click Save button but do NOT reboot the router.
 
Step 6:
Go to Network -> LAN and change the LAN IP to a different IP address but still in the same subnet as the root router. Save the setting and reboot the extended router.
 
Step 7:
All settings required by WDS function is completed. You can make a simple check by the Ping utility. If the ping proceeds successfully (which means the WDS performs properly), you will see the similar screen as below: (in this example, 192.168.0.1 is the IP address of the root router)
Readmore...