Pages

Banner 468

Showing posts with label Expand your wireless network. Show all posts
Tuesday, 19 November 2013

Router Tips to Make Your Wireless Faster

0 comments
 

The router is the technological workhorse of the modern home, bringing Internet to your many devices. A router’s wireless speed is usually a user’s main concern: Unlike wired networks, wireless networks seem to suffer interference from objects in our everyday lives--should the router be above the dryer, or below; next to the microwave, or above? Wireless speeds can also be affected by too many devices sharing the same access point as well. Your device is fighting for limited bandwidth.

Many basic ways to improve your Wi-Fi network are available, such as placing the router in the center of the area you want it to cover, keeping the router away from metal objects that could block the signal, or making sure there aren’t too many other radio-enabled devices broadcasting on a 2.4GHz signal (standard for most older routers). But other ways to improve your signal may be a little less apparent. Here are some of those tricks (feel free to add your own workarounds in the comments below).

Check Your Speed
Although most people can gauge if their home wireless is too slow or not, checking the speed of the connection will let you know for sure whether you’re within range of the speed promised by your provider. Downloading a lightweight piece of software like LAN Speed Test gives you upload and download speed numbers in megabits per second (mbps), which you can check against your ISP’s promised speed to see if your network is actually slow or if you just need to pay for faster service. You’ll probably need to run the test multiple times and at different times of the day to get a real sense of how fast your Wi-Fi is overall, as crowding on the 2.4GHz spectrum could cause slowdown during the busiest times of the day for Internet traffic.

Change the Channel

If your wireless is weaker than it should be, you can try manually adjusting the broadcast channel to find one with fewer wireless routers competing for space. If your router is relatively new and automatically chooses which channel to broadcast from, then you won’t get too much use out of pinning your wireless down to a single channel, but for older routers it’s worth looking into.

First you’ll want to go into the router’s graphical user interface (GUI), by typing the router/gateway address into the address bar in a browser window while your computer is connected to the router’s wired or wireless network. You can usually find the router’s address on the router itself, in the instruction manual, or online if all else fails. For example, if you have a D-Link router, you’ll type http://192.168.0.1; if you have a Linksys, you’d type http://192.168.1.1. The browser will prompt you to enter your user name and password.

The exact navigation through the GUI for each router is different, but once you find the router’s wireless options (usually under headings like “LAN” or “Network”), you should see a “wireless channel” option. In North America, you can broadcast from channels 1, 6, and 11. Try switching to one of those three channels that’s not currently in use and see if it speeds things up.


Add Some Hardware Changing the actual hardware that makes the wireless signal waft through your house is an easy way to strengthen a wireless signal throughout a larger area. While most routers come with omnidirectional antennae (meaning they broadcast signal in all directions), you can also invest in a single-directional antenna that should double the strength of your signal, but only in one direction. This is great if you must place your router by a wall, and you don’t want to waste resources transmitting half of the wireless signal through the wall or window. Single-directional antennae can cost anywhere from $20 to $120.

Wireless repeaters do a similar thing, basically just repeating the signal put out by your router and helping you cover more space with Wi-Fi. These also cost around $20 for a low-end repeater, but if you’re up for a little DIY you can make your own wireless repeater for free by uploading custom firmware from DD-WRT to an old router (step-by-step instructions here, and an explanation of DD-WRT below).

Another hardware-related change: if you have multiple rooms you need to cover with your signal, consider buying a hybrid Homeplug/ wireless router device. Homeplug technology uses the AV line in your house to transmit broadband signals to other rooms, and if you include a wireless router on the adapter, you’ll have a Wi-Fi signal right there in the room with you.
Check Who’s on Your Network
You never want to leave your wireless signal without at least some sort of protection, and it’s worth noting that there are different levels of security on every router. Again, you’ll want to go to your router’s GUI and check its wireless security settings. Often, there will be a drop-down or click-to-select menu to allow different levels of security. WEP is the weakest form, and is easily broken; WPA is much more secure; and while WPA2 is the most secure, it can sometimes be incompatible with older devices on your network, so WPA is probably the best bet if you’re not sure what you want.

Again, somewhere in your router’s configuration (under “wireless” or “status”) there should be a list of devices that connect to your system. Keep in mind that this list of devices will also include the laptops and smartphones of any guests who used your Wi-Fi recently, or any cameras, printers, or other Wi-Fi enabled devices that you might use around the house. If you’re unsure, you can match the Media Access Control (MAC) addresses listed on the router GUI with the MAC addresses of your various devices.

If you do find intruders, you could change your wireless password, or some routers will allow you limit the number of devices that can connect to your network. Of course, there are programs out there that will allow you to triangulate the location of the moochers based on network signals. While the legality (and sanity) of trying to track down people who are using your Internet is questionable (and not sanctioned by PCWorld) there would probably be nothing wrong with knocking on your downstairs neighbor’s door and politely asking them in person to get off your Wi-Fi. There is, of course, the famous “Upside-Down-ternet” gag, where you turn the Wi-Fi thief's browser pages upside down, or make their browser pages blurry, or replace them with kittens! While it sounds fun, it’s a pretty advanced trick, so the average user might want to switch to WPA security and password-protect the network instead.


Adult Site Blocking With Open DNS
OpenDNS can block phishing attacks and adult sites.
Many new routers come with parental control options built into the device’s features. If you have an old router, however, you can use a service like OpenDNS. When your browser receives the command to retrieve a URL, it must go through a DNS server, which will look up the site’s numeric IP address. OpenDNS uses it’s own DNS lookup technology to resolve your browser’s page, meaning it can often bring up a web page faster. But one of the big perks for parents is that it also can block phishing attacks and adult sites that might get your kids in trouble.

OpenDNS doesn’t even require that you subscribe with them (the free version is ad-supported). Simply go to your router’s GUI and switch from an auto-generated IP address to a static IP address; then in the fields for DNS (there are usually 2 to 4 spaces for you to add a DNS lookup number), enter OpenDNS’s look-up numbers, which you can find on the OpenDNS site. Doing this from the router, rather than just configuring OpenDNS on a specific computer, will protect all the computers connected to that router.


Install Updated or Custom Firmware If you have an older router, or the settings on your new router don’t offer all the functionality you’d like, try upgrading your router’s firmware. Often, your router manufacturer will have firmware updates that you can easily download from the manufacturer’s website. And if you really want to supercharge your router, you can even upload custom firmware provided by DD-WRT.

While a lot of newer routers offer out-of-the-box DD-WRT compatibility, you can check on the DD-WRT website to see if your older router is compatible with the custom firmware. Upgrading can mean better firewalls, the ability to designate how much bandwidth each device on your network gets, and even client isolation, so that wireless users can connect to the network without being able to see each other (an important part of hosting a public access point). Follow the directions on the site to flash your router with DD-WRT, and then use it to modify your router to fit your needs.


Hybrid Modems/Routers Aren’t Off Limits
If your Internet service provider requires that you install a hybrid modem/router, you can try adding another router onto the system to get different functionality.

When I moved into a new apartment recently, I decided to subscribe to AT&T Uverse, which uses fiberoptic cable to bring the Net to your computer. AT&T requires subscribers to use a hybrid router/modem, and in my case the company installed a 2Wire 3800HGV-B modem/router. The Wi-Fi was okay, but the device had an 802.11g wireless access point, and I wanted to try my newer TRENDnet TEW-691GR router, which had an 802.11n access point.

In order to broadcast wireless from the TRENDnet router, I modified the two routers to work with each other. First, I went to the 2Wire’s summary status page, and under “Internet Details” recorded the primary and secondary DNS numbers, and also the range of the IP addresses listed under “Private Network DHCP info”, which in this case happened to 192.168.1.64 - 192.168.1.254.


A TRENDnet router's settings page. (Click for larger image.)
Then I connected an ethernet cable to a LAN port on both the 2Wire modem/router and the TRENDnet router, connected the TRENDnet router to my computer with another ethernet cable, and entered the TRENDnet configuration page. I navigated to “network” and “WAN setting” (although with other routers you might just look for the option to change the connection type and the DNS server setting). I changed the connection type to “Static.” In the field for IP address, I entered a number within the range given above; in the “subnet mask” field, I entered 255.255.255.0; and in the “default gateway” field, I entered the original 2Wire router/modem’s gateway address, as found on the router itself. Then, under DNS Server Setting, I entered the primary and secondary server settings that I found in the 2Wire’s configuration page. I saved everything, then went back to the 2Wire device.


A settings page of a 2Wire modem/router for AT&T's U-verse service. (Click for larger image.)
In the 2Wire’s configuration page, I first went to “system info,” then “Event Notifications,” and checked “enable detection of router-behind-router conditions.” Then, I navigated to the “Broadband” tab and clicked “link configuration.” Under “add additional network,” I checked “enable” and gave the TRENDnet router’s address (which I had used earlier to enter the TRENDnet’s GUI ) and the subnet mask 255.255.255.0. Don’t forget to keep saving your settings.

With the TRENDnet router still connected by a LAN port to the 2wire’s LAN port, both devices should be on and giving a wireless signal. When you can connect to both wireless networks successfully (you may have to close out of your browsers or do a “power cycle” by turning both the routers on and off), then you can go into the 2Wire’s modem/router menu and disable the “wireless” tab.

At this point, no wireless signal is coming from the 2wire, and all of the wireless transmitted in my apartment is at 802.11n standards. This workaround seemed to make my wireless slightly faster, but more unreliable. The network connection would suddenly crash, but when it was up and stable I seemed to be able to download videos faster. I would recommend activities of this type for experimentation only, as I ultimately just went back to the more stable 2Wire wireless network.
Readmore...

Tips to Boost Wireless Speed, Range, and Reliability

0 comments
 
Wireless internet is awesome…When it’s fast, reliable, and has wide coverage that is.  When the signal keeps dropping or the speed is so slow you might as well be on dial-up, it’s another story. Frustrating might be a mild description of the emotions a cruddy wireless network can evoke.
Thankfully, there are a number of easy, and completely free, tricks to get your WiFi working like a champ.  We wrote this guide so even those “technologically challenged” among us can run through it in a few minutes.
But, before you dive in, you will need to login to your router using a web browser. Lucky for you, we’ve got a simple guide called “How to Login to a Wireless Router” that will lead you through the process.
Once signed into the router, you might have to click around a little bit to find the settings we need to adjust. Generally, you are looking for some sort of “wireless settings” or “advanced wireless settings” page. Don’t be afraid to poke around a little bit. We’ll let you in on a little secret. The all-knowing and oft nerdy IT people actually aren’t all-knowing. Quite often they have no idea how to solve a problem. However, they are willing to click around until they find the setting they are looking for.
Most computer wary people just need a confidence boost. Need some help getting the gumption to tackle this task? No problem. Here’s 13 things to make your day better. Okay, now we’re ready to kick some wireless butt.
Note: This tutorial assumes you already have a wireless router setup and that the computer you are using is connected to that network (hardwired connected is preferable). It is also written specifically for 802.11B/G/N devices. All of the tips are also applicable to 802.11AC, but the instructions may be slightly different.

1. Optimize wireless router location

Probably the easiest and most important improvement you can make is physically moving your router. Try a centralized location in your home. If it’s a two story home with a basement, put the router in the middle of the home on the first floor. Keep it away from devices that can interfere with a wireless signal, like a microwave or cordless phone. Also keep it away from foundational walls and out of cabinets. Don’t shove it at the bottom of an AV rack stuffed with home theater equipment or in your utility room. Your ultimate goal is to maximize coverage in the home by keeping the router away from things that might block or otherwise interfere with the signal. Try out a few different locations and then walk around your home with a wireless device and see how the signal changes.
Each time you move the router, you will want to record what the signal strength is and perform a speed test. This allows you to be more precise and strategic about the process, particularly in later parts of this guide. You can test the signal strength simply by observing how many bars your device shows. For those wanting the most accurate results possible, consider downloading the program inSSIDer. It allows you to see the wireless channel and signal strength of all of the wireless networks within range.

2. Hard wire as much as possible

This is a pretty simple suggestion. The fewer devices on a wireless network, the faster the network is likely to run. Not to mention that a hardwired connection is faster and more reliable in the first place. This process may involve moving some of your equipment around so you can get an Ethernet cable to it from the router. If you know your way around CAT cabling, you might check to see if the phone lines in your home are wired using CAT 5 or CAT 6. If they are, you could use the phone cables throughout your home to hard wire devices (heck, even CAT 3 can be made to work). You might also consider using an Ethernet over powerline adapter explained in our article on how to add wireless to hardwired devices.

3. Disable old wireless protocols

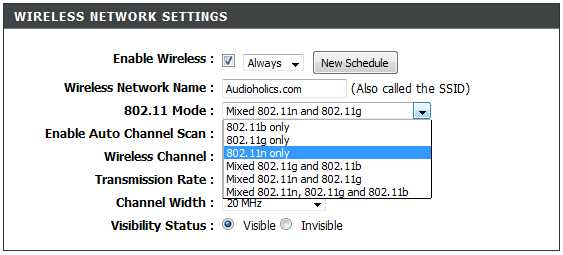
Even though your fancy new router may be super-fast with 802.11n (or even 802.11ac), as soon as a device connects using an older protocol, say, 802.11g, the entire network slows down. The fix to this problem is to set the router to only broadcast newer wireless modes. For your reference, the speeds from slowest to fastest are: b, g, n, ac. Notice in the picture below that you can select which modes you want the router to work with.

wireless protocal g/n 
Disable Old Wireless Modes
If all of the devices on your network support wireless n (802.11ac is faster, but most devices don’t support it yet), then select “802.11n only”. Unfortunately, this will kick any devices not compatible with wireless n off of the network. You can either:
A) stop using the older devices.
B) upgrade their wireless cards, if possible.
C) hardwire them to the router instead of connecting wirelessly.
D) select a mixed operation mode (like 802.11g + n), or E) purchase a dual band router.
Dual band routers are like having two routers built into one (close enough, anyway). They can broadcast two separate wireless networks simultaneously. This means that you could setup a wireless g network for you older devices, and a wireless n network for newer devices. This allows the older devices to connect to WiFi without slowing down newer devices. But don’t get too excited yet. Dual band routers operate by sending out the two wireless networks on different frequencies, one at 2.4Ghz, the other at 5Ghz. Many new wireless devices still do not work on a 5Ghz network, even if the device is 802.11n compatible. Additionally, 5Ghz wireless networks have poorer range than 2.4Ghz networks. You will want to do some research to find out which devices of yours actually support 5Ghz before investing in a dual band router. With that said, if you are planning on buying a new router anyway, go with a dual band router.

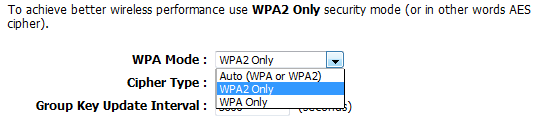
4. Use WPA2 security only

WEP encryption used to be the standard when it came to wireless security. However, now it’s not only a poor form of protection, but it can limit the speed of your network. The same goes for the more modern WPA standard. If possible, you should limit your router to only work with WPA2 encryption.
wpa2 security only
Wireless Encryption Settings

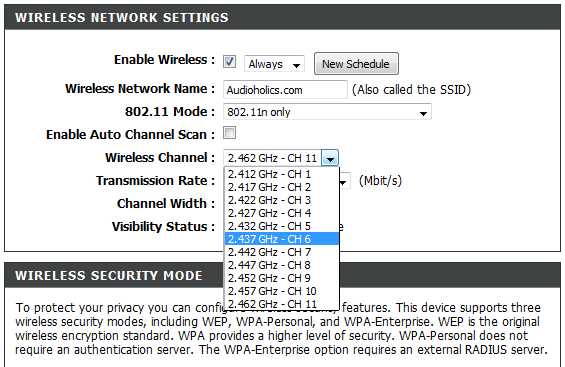
5. Change the wireless channel

You’re certainly not the only person on the block with wireless internet and routers only operate on a limited number of channels. Multiple routers operating on the same channel can cause all sorts of issues, including dropping a wireless signal all together.
First, go to an area you normally have wireless problems. If there aren’t any real problem areas, just move a few rooms away from the router.  Before changing anything, test the signal strength and speed, like you did when determining the best location for the router. This gives us a baseline and allows us to gauge the effects of any change we make.
wireless channel
Wireless Channel Setting
Most routers set the channel to “auto” by default. Find the channel setting in the router menu, and select the lowest option (CH 1 for 2.4gHz networks), then go back and check the signal strength and speed again. Repeat this process with a few different channels. I typically only test the lowest, middle, and highest channels. Once you have found the channel that gives you the best performance, select it and save the settings.

6. Change channel width

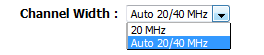
As wireless protocols have advanced, one of the ways they have increased speed is by operating using wider wireless channels. Wireless n routers need to use a 40Mhz channel width in order to achieve maximum speed. Most routers come with 20MHz as the default width, this is in an attempt to avoid interference. So, there is a potential for this change to negatively affect some users. If you start to notice issues, switch back to a 20Mhz operation. Also note that this isn’t really for increasing how fast you browse the internet, this change is more likely to be evident when streaming/transferring files between devices on your network.
Simply find the “Channel Width” setting in your router’s setting and change it to “Auto 20/40MHz”.
wireless channel width
Channel Width

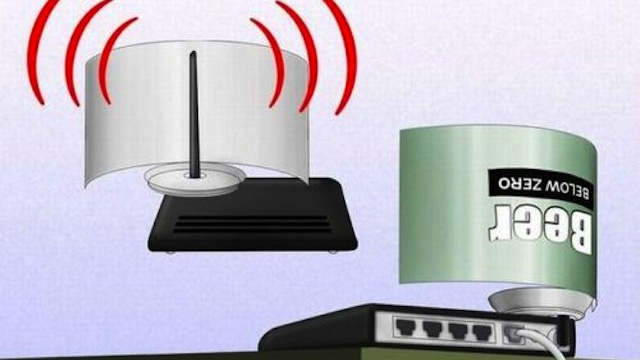
7. Use your DIY skillsDIY Antenna - courtesy of Lifehacker.com

If all of the by-the-book solutions fail, then think outside the book (or box). One of the most common DIY methods for creating a killer wireless network is to upgrade the firmware of your router to a version that allows you to boost output. The most common router used for this in an older version of the Linksys WRT54G, and the firmware is called “Tomato”. Lifehacker actually has a pretty good tutorial on the entire process. Keep in mind that not all routers are compatible with alternate firmware.
A second DIY option is to modify the antennae on the router. This is most easily done on routers with visible external antennae. If the original antennae can be unscrewed, purchase larger antennae and install them in place of the default set. Another option is to cut up a pop can or aluminum foil and direct the antenna signal in one direction, much like a satellite dish.

Conclusion

Following these 7 steps should allow you to get the most out of your wireless network. In some cases, you will notice huge benefits. For other people, who already have a solid network or don’t perform any bandwidth intensive tasks, the benefits might be more subtle. Either way, these tips should be considered best practices for setting up any wireless network.

Readmore...
Thursday, 15 August 2013

ISA Server

0 comments
 

What happened before ISA Server?

The history of ISA Server goes back to a product named Proxy Server 1.0. At the time, the m fast and secure Internet access market saw one more player - the Microsoft Corporation. Proxy Server 1.0, however, was merely a means for the effective conduct of initial market research. The market responded favourably to this product being integrated within the existing Windows NT 4.0 enterprise networking systems. The first edition of MS Proxy Server had many limitations. It supported only a few basic Internet protocols and its implemented security tool functions were rather obsolete.
Microsoft’s second try at a Proxy Server 2.0 was a natural evolution with many useful and expected functions. One great application of this tool is to use Windows NT account databases. Therefore, user management within the enterprise has been considerably simplified. Many more protocols are supported, as well as caching services, packet filtering capability and considerably enhanced security performance have also been incorporated. Although it was an improved version, Proxy Server 2.0 still suffered from a limited range of functions compared to third-party products.
This is surely not Microsoft’s last word. In the time of Windows NT 4.0 successors, i.e. Windows 2000 and the newest Microsoft Windows Operating System, Windows XP, new possibilities have emerged in the sphere of implementation of the technologies they incorporate.
 

New concepts created by ISA Server

ISA Server carries new terms that need to be understood before attempting product deployment on the network.
  • Array a group of ISA computers that are located close together, for example a department, office, and region. There are two types of arrays:
Domain Arraysthat use Active Directory. A domain array can encompass computers located within a single domain.Independent Arrays – allow storage of information not in the Active Directory, but in a local configuration database. This array is mainly used in NT 4.0 based networks.
  • Rulewith rules, the system administrator can set up a series of protocols to govern sites, contents, protocols, and IP packet filters.
  • Array policya set of rules that define the array policy. Such a policy can be applied to any specific (and single) array.
  • Enterprise policy – enterprise-level policies contain similar rules to those established in array policies but they are applied to multiple arrays.
With ISA Server, array policies can be used to modify enterprise policies making them more restrictive. However, it is not possible for an array policy to ease restrictions imposed by the enterprise policy.
 

ISA Server Components

ISA Server supports many more functions than its predecessor. The following options are available with this new product:
  • Firewall – the Firewall client is an extension to the ISA Server that features an enhanced set of functions allowing it to compete with other similar products available on the IT market. With Firewall client, Active Directory can be supported from Windows 2000 (or the SAM databases from NT). These are used to provide specific security functions at user or group level. This feature is not supported by a majority of third-party products that use either separate user databases or IP addressing. Firewall functions are enhanced to support so called stateful packet inspection, i.e. a solution for improved security where data packets passing through the firewall are intercepted and analyzed at either a protocol or connectivity level.
  • Policy-based administration – ISA Server lets the administrators manage using predefined policy rules. Policies can include a set of consistent rules regarding users, groups of users, protocols etc. A specific policy may apply to a single array or globally, to the whole enterprise. For businesses that use networks with Active Directory enhancements, multi-tiered enterprise policies are those that match their needs to have a comprehensive IT system, to facilitate management of the entire enterprise and its infrastructure.
  • Virtual Private Network Support – ISA Server provides an easy solution to create VPN – based networks. The wizards supplied with ISA Server help to configure VPN tunneling and may activate the RRAS service if not already initialized.
  • Dynamic IP filtering – depending on the security policy used, an enterprise can dynamically open firewall ports for authorized Internet users on a session-by-session basis. This considerably simplifies the administrator’s duties in situations where there are applications that frequently change ports though they communicate with each other.
  • IDS (Intrusion Detection System) – Microsoft has equipped the ISA Server with an Intrusion Detection System. This module had been purchased from Internet Security Systems, the leading developer in these IT solutions. Thus, ISA offers out-of-box support for preventing several types of attacks including WinNuke, Ping of Death, Land, UDP bombs, POP Buffer Overflow, Scan Attack. Once an attack has been detected and identified, ISA may decide either to disable the attack or notify administrators about the event.
  • Web Cache – ISA Server provides fast Web caching performance. Administrators are allowed to automatically refresh frequently requested www pages on reverse and scheduled caching basis.
  • Reports  the major point of contrast between ISA and its predecessor i.e. Proxy Server 2.0 is that ISA features numerous report generating possibilities. By scheduling report generation connected. for example, with the users’ actions or security related events, managing ISA Server based networks is a simple task.
  • Gatekeeper H.323 – this component allows ISA Server to manage IP telephony calls or H.323-based VoIP applications (for example Microsoft NetMeeting 3.0). The DNS SRV record must be registered in order to have gatekeeper enabled.
  • Client Deployment – with SecureNAT (Network Address Translation) feature, ISA Server delivers to clients and servers a transparent and secure access to the Internet with no need to configure extra software on client machines. SecureNAT allows monitoring of all traffic in ISA Server.
Therefore, instead of being a simple product improvement, Microsoft Internet Security and Acceleration Server fills a gap in the range of this type of products available at the Redmond colossus and is trying to jump aggressively into the mass market sector associated with Web security and fast Web access. The new potential implemented in ISA Server is expected to allow Microsoft to compete effectively in this business area.
It should be noted that Microsoft’s engineers carefully integrate all products together to bring the Company’s vision of a .NET platform to businesses.
 

Software and hardware requirements

The minimum hardware requirements recommended by Microsoft for this product are:
  • 300MHz or higher Pentium II compatible CPU,
  • 256 MB of RAM,
  • 2 GB hard-disk space on NTFS formatted partition,
  • 200 MB of available hard-disk space for installation.
ISA Server requires a computer running Windows 2000 upgraded to Service Pack 1 or greater.
Problems with insufficient server capacity may occur with this type of configuration. Thus, for various ISA Server usage scenarios, the hardware should be adequately strengthened.
If ISA Server is to be used as a firewall, one will need to consider how powerful the CPU should be in terms of throughput requirements.
Throughput requirements
Recommended CPU
Less than 25 Mbyte/s
Pentium II 300 MHz – 500 MHz
From 25 Mbyte/s to 50 Mbyte/s
Pentium III 550 MHz or better
More than 50 Mbyte/s
Pentium III 550 MHz or better for each 50Mb
Table 1 CPU capacity requirements vs. throughput
Obviously these values can only be used as a reference when planning the ISA Server’s hardware to meet the expected load. This may vary in function or various usage scenarios (such as the type of transmitted data).
In case ISA Server is to be deployed as a Forward Cache, in addition to an adequate CPU capacity consider also requirements for RAM and high free disk space available for caching purposes.
Number of users
Recommended processor
Minimal RAM capacity (Mb)
Recommended disk space allocated for caching
Up to 250
Pentium II 300 MHz
256
4 GB
250 – 2000
Pentium III 550 MHZ
256
10 GB
More than 2000
Pentium III 550 MHz for every 2,000 users
256 for every 2000 users
10 GB for every 2,000 users
Table 2 – Capacity planning for forward caching server applications
If you want to use ISA Server in Integrated Mode (see Installation), these values will be further augmented. Therefore, the performance of any computer intended to operate as an ISA server will be completely utilised.
 

Installing ISA Server

A Windows 2000 Server with a full implementation of Active Directory is the minimum on which it is possible to install Microsoft ISA Server. Before installing ISA Server, one must configure Active Directory (adding required classes and selecting object properties).
Fig. 1: ISA Server setup screen with selected AD schema modification option
Before the system attempts to update the schema you will be warned that this action is not reversible.
Fig. 2: Active Directory’s modification-related warning
When modifying the schema, it is necessary to determine what the intended extent of modifications to the existing policies integrated in AD would be. In case of problems with the modification of Active Directory, one should consult the Ldif.log file.
 Fig. 3: Modifying Active Directory
Once the Active Directory has been updated, you can attempt to install ISA Server. In the first step, you will be requested to supply the information about the installation mode (Typical, Full, Custom).
 Fig. 4: ISA Server installation options
After this step, the set-up wizard checks whether Active Directory has already been installed or not and if any settings have been modified. Next, you will be prompted to determine if the server should be a part of a domain or be used as a standalone unit. In the next step, select the mode of operation from the following three options:
·        Firewall – with this option, ISA Server will function as a very powerful firewall,
·        Web Cache – will establish the ISA Server as a cache server and give access to ‘Net resources’
·        Integrated Mode – when in integrated mode, all ISA Server implemented and initialized features will be available.
Fig. 5: Selecting the functional mode
Once the required mode has been selected, the next dialog box stops the Internet Information Services (if any are already installed) and prompts you to either deinstall IIS or re-configure it not to listen in on ports 80 and 8080 that are required for ISA Server. Despite possible joint operation, Microsoft recommends relocating the IIS Server to another machine.
In the next step, you will be prompted to specify the cache size for the Web Cache service.
Fig. 6: Configuring the cache size for WWW caching
If it is a multiple-disk server, one may benefit by distributing caches onto a few disks. This would accelerate the process of accessing cacheable information.
Having configured appropriate cache sizes for WWW Web services one may attempt to configure LAT (Local Address Table).
Fig. 7:  LAT setup utility
LAT (Local Address Table) – these are tables that define all internal IP address ranges. If one selects this Table (Fig. 7), either the private IP address ranges as defined in RFC 1918 (10.X.X.X, 172.16.X.X, 192.168.X.X) or the external Windows 2000 routing tables will be used.
Fig. 8:  A default LAT
Once this step is successful, you will get a screen with the end of LAT configuration. Remember to ensure that all network cards are connected to the Internet while installing ISA Server. Should any network card be inactive, LAT tables will probably not be created.
Fig. 9: Completing the LAT setup procedures
After completing the setup procedures, you can attempt to replicate the content of all files to the ISA Server directory. After installation, the ISA Server Administration utility will start.
Fig. 10: Microsoft ISA Server Administrator utility and Getting Started Wizard
To manage this utility, use the Microsoft Management Console (MMC) feature. The left dialog box contains all options that are necessary for setup whilst the right box provides the settings available for such options.
 

Getting Started Wizard

Because ISA Server is completely different from Proxy Server 2.0, Microsoft recommends that even experienced administrators become acquainted with the Wizard that will help in the initial steps of product configuration and customization.
The Getting Started Wizard works with a set of options that will aid
users through the process of customizing the product and will also clarify the effects of specific modifications when introduced to the ISA Server.
The Wizard is split into two sections (see Fig. 10):
  • Configuring policies,
  • Configuring arrays.
After you have finished the initial configuration of ISA Server with help from the Getting Started Wizard, you can fully adapt the product to the working environment by finally re-adjusting certain settings.
 

Creating protocol rules

Administering an ISA Server means creation of suitable arrays, rules and policies. Arrays and policies have already been explained so let us examine the term “rules”.
ISA Server uses two types of rules:
  • Site and content rule – determines if and when content from specific Internet destinations can be accessed by users,
  • Protocol rule – determines which packets may or may not access the ISA server.
Apart from the above rules, the following rules can also be defined for ISA server:
  • Bandwidth (Capacity) rule – this will prioritise different types of services using ISA server. This allows administrators to verify which specific www traffic or business-related traffic will be allocated to the available bandwidth.
  • Web publishing rules– to “publish” incoming HTTP, HTTPS, FTP requests and map them as services on the ISA Server.
  • Server publishing – with this feature, clients from the public Internet are directed to the ISA Server instead of to the web server.  Moreover, the ISA Server may act as the proxy for inbound and outbound traffic between the public Internet clients and the internal web server.

Web Cache functions

ISA Server features high-performance Web Cache functions. With Cache Configuration tab the user is guided through Web service configuring. In addition to a variety of settings, the possibility exists to set up the size of the cache memory per hard disk and configure the schedule of caching tasks (TTL utility).
Fig. 11: Configuring caching services
When ISA Server is set up as a Web caching server, two situations are possible:
  • Forward Web Caching Server – this is the most popular use of the Web caching server. Its function is as follows:
 Fig. 12: Forward Web Caching Server 
  1. User No. 1 (Client 1) forwards a request to the Web server for an object;
  2. The ISA Server approves the request and checks if the object already exists in the local cache.   If the content does not already exist in the cache, the ISA Server contacts the Web server to fetch the requested object (on behalf of the user);
  3. The Web server returns the object in question to the ISA Server;
  4. ISA Server returns the Web object to the original client No. 1, and saves this object to cache it locally.
  5. User No. 2 forwards the request for the same Web object;
  6. ISA Server will send the object cached locally to user No. 2.
  • Reverse Web Caching Server – Reverse Proxy by an ISA Server offers security for one or more Web servers located on the internal network.  This ensures secure Web publishing, which is of particular concern if sensitive data is to be sent from the servers.
Fig. 13: Reverse Web Caching Server
In addition to the security offered by both forward and reverse caching, ISA Server could be configured to give administrators the possibility to manage various Web caching solutions such as:
  • Scheduled Content Download – ISA Server can be configured to provide tools for downloading/refreshing web pages at appropriate intervals. In this way, the most popular web objects may be refreshed at night instead of during the day without risking overloaded connections.
  • Active caching – when active caching is used, ISA Server itself will evaluate and rank the cache and refresh it as necessary. This is a particularly useful option in situations where employees must use specific url sites to fetch necessary information several times during the day, from sites that are frequently updated, and especially if it is risky to fetch non updated versions.
  • On Demand – the most popular configuration of a caching server: upon an initial request for on-demand content, the server acquires requested Web files and stores them locally in its cache.
     

Secure Internet Access through ISA Server

Secure Internet Access is one of the fundamental features provided by ISA Server. It is increasingly necessary to improve security tools and check users that access the network from outside, especially in a situation where the Global Web is vulnerable to outside interference from viruses, trojan horses or hacker attacks.  One may also wish to improve security to monitor network users and protect the network from potential Internet threats. To face this challenge and provide solutions for a broad landscape of users, Microsoft has implemented three types of clients in ISA Server:
  • Firewall clients – all computers that have Firewall Client software installed and active,
  • SecureNat clients – all computers that do not have Firewall Client software installed,
  • Web Proxy clients – all Web browser clients are configured to use ISA Server.
     
Feature
SecureNat Client
Firewall Client
Web Proxy Client
Installation required?
No, but some network configuration changes required
Yes
No, requires Web browser configuration
Operating System support
Any OS that supports TCP/IP
Only Windows platforms
All platforms
Protocol support
Requires application filters for multi-connection protocols
All Winsock applications
HTTP,SHTTP,FTP,
Gopher
User-level authentication
No
Yes
Yes
Server applications
No installation or configuration required
Requires configuration file
N/A
Table 3   Comparison of ISA Server Clients
Both Firewall and SecureNat clients include WebProxy client service, since all Web client requests are passed to WebProxy. All other requests sent by either Firewall or SecureNAT clients are redirected to other modules within ISA server.
Before selecting the client type to be used in a specific enterprise, it is necessary to recognize what particular applications and protocols are to be used in the network. A proper evaluation will help to have trouble-free use of Web services without continuous changes to the configuration. Choosing reliable clients is also the foundation for all network security since a more liberal access policy to Internet facilities may threaten not only e-privacy but also e-access. It is enough to realise that a few users who are downloading MP3 or AVI files from the Net and have a few Internet sessions open will be sufficient to occupy an enterprise connection at nearly 100 percent utilisation.
Network need
Recommended client type
Reason
To avoid deploying client software or configuring client computers.
SecureNAT
SecureNAT clients do not require any software or specific configuration on client machines.
To use ISA Server only for forward Web caching.
SecureNAT
If one uses ISA Server as a Web caching server, one will not have to deploy any special software.
One wants to create user-based access rules to control non-Web Internet access.
Firewall Client
If one uses Firewall clients, one may configure access rules for non-Web sessions. However, these rules will be effective only if one configures ISA Server to require authentication information with each session.
The network supports many roaming users and computers.
Firewall Client
SecureNat clients do not support automatic discovery of ISA server. When one configures automatic discovery, roaming users or computers cannot connect to the Internet server as appropriate.
The clients need access (outside of Web browsers) to protocols with secondary connections to the Internet via FTP.
Firewall Client
SecureNat clients do not support protocols with secondary connections.
To support dial-in-demand for non-Web sessions from the clients.
Firewall Client
Though SecureNat supports dial-out, only Firewall clients support dial-in-demand for non-Web sessions.
Table 4 Choosing an ISA Server Client Type
Table 4 represents the choice that may be useful to benefit from a proper selection of clients accessing the network in a specific enterprise. For more detailed specification of the particular types of clients see the files attached to the program.
 
Readmore...