How to crimp ethernet cable | How to crimp cross over cable or straight through cable with color code
How to crimp ethernet cable | How to crimp cross over cable or straight through cable with color code
Tag: how to crimb
ethernet cable, how to crimb crossover cable or straight through cable
with color code, straight through cable color code, crossover cable
color code, cross over cable color codeFull detail to
crimp Ethernet cable OR How to crimp cross over cable or straight
through cable with color code. It is very easy to crimp straight through
cable or cross over cable with these steps.
What we need to crimp a crossover or straight through cable:
- CAT 5 Cable - bulk Category 5, 5e or 6 cable
- RJ45 Ends
- Crimper for RJ45
- Wire Cutters - to cut and strip the cable if necessary
Recommend:
- Wire Stripper
- Cable Tester
About the Cable:You can get the cables on any computer stores near you.
You want UTP (Unshielded Twisted Pair) Category 5 cable for basic 10/100 functionality.
You need CAT 5e for gigabit (1000BaseT) operation and CAT 6 gives you a measure of future proofing.
There
are basically 2 categories, solid and braided cable. Braided cable
tends to work better in "patch" applications for desktop use. It is
more flexible and resiliant than solid cable and easier to work with,
but really meant for shorter lengths. Solid cable is meant for longer
runs in a fixed position. Plenum rated cable should/must be used
whenever the cable travels through an air circulation space. For
example, above a false celing or below a raised floor. You're likely
going to want braided type cable but it may be difficult or impossible
to tell from the box.
Here is what the internals of the cable look like:
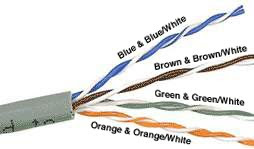
Internal Cable Structure and Color Coding
Inside
the cable, there are 8 color coded wires. These wires are twisted into
4 pairs of wires, each pair has a common color theme. One wire in the
pair being a solid or primarily solid colored wire and the other being a
primarily white wire with a colored stripe.
Note:- (Sometimes
cable doesn't have any color on the striped cable, the only way to
tell is to check which other wire it is twisted around).About the RJ45 Ends:The
RJ45 end is a 8-position modular connector that looks like a large
phone plug. There are a couple variations available. The primary
variation you need to pay attention to is whether the connector is
intended for braided or solid wire. For braided/stranded wires, the
connector has contacts that actually pierce the wire. For solid wires,
the connector has fingers which pierce the insulation and make contact
with the wire by grasping it from both sides. The connector is the weak
point in an Ethernet cable, choosing the wrong one will often cause
grief later. If you just walk into a computer store, it's nearly
impossible to tell what type of connector it is. Here is a diagram and
pin out:
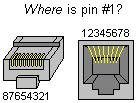 Ethernet Cable Pinouts:
There are basically two crimping types.
- A
straight through cable, which is used to connect different devices.
Example, a hub and switch, Router and computer, hub and computer.
- A
cross over cable, which is used to operate in a peer-to-peer fashion
without a hub/switch. Some interfaces can cross and un-cross a cable
automatically as needed.
Straight-Through Crimping Color Codes ( Both Ends are Same )
- White/Green
- Green
- White/Orange
- Blue
- White/Blue
- Orange
- White/Brown
- Brown
Above is the Straight-Through Cable Pinout for T568A
Crossover Cable Crimping Color Codes ( Both Ends are Opposite )First End Color Code:
- Orange/White
- Orange
- Green/White
- Blue
- Blue/White
- Green
- Brown/White
- Brown
Second End Color Codes
- Green/White
- Green
- Orange/White
- Brown/White
- Brown
- Orange
- Blue
- Blue/White
Note: The cross over cable layout is suitable for 1000Base-T operation, all 4 pairs are crossed.How to wire Ethernet Cables:
- Strip off about 2 inches of the cable sheath.
- Untwist
the pairs - don't untwist them beyond what you have exposed, the
more untwisted cable you have the worse the problems you can run into.
- Align the colored wires according to the diagrams above.
- Trim all the wires to the same length, about 1/2" to 3/4" left exposed from the sheath.
- Insert
the wires into the RJ45 end - make sure each wire is fully inserted
to the front of the RJ45 end and in the correct order. The sheath of the
cable should extend into the RJ45 end by about 1/2" and will be held
in place by the crimp.
- Crimp the RJ45 end with the crimper
tool Verify the wires ended up the right order and that the wires
extend to the front of the RJ45 end and make good contact with the
metal contacts in the RJ45 end.
- Cut the cable to length -
make sure it is more than long enough for your needs. Remember, an
end to end connection should not extend more than 100m (~328ft). Try
to keep cables short, the longer the cable becomes the more it may
affect performance, usually noticable as a gradual decrease in speed and
increase in latency.
- Repeat the above steps for the second RJ45 end.
- If a cable tester is available, use it to verify the proper connectivity of the cable.
That
it! If your cable not worked, look closely at each end and see if you
can find the problem. Usually a wire ended up in the wrong place or
more commonly, one of the wires didn't extend to the front of the RJ45
connector and is making no, or poor contact. If you see a mistake or
problem, cut the end off and start again.

 I
wanted to start off the month of March with a feature of the “how to’s”
of Wireless Routers. I am still amazed at how many people are not
taking advantage of the wireless router, for making your entire home or
business a working/playing zone. So, let’s get at it.
I
wanted to start off the month of March with a feature of the “how to’s”
of Wireless Routers. I am still amazed at how many people are not
taking advantage of the wireless router, for making your entire home or
business a working/playing zone. So, let’s get at it.

 Subscribe to email feed


