Pages

Banner 468

Showing posts with label Windows Server 2012 Tutorial. Show all posts
Friday, 4 April 2014

Windows Server 2012 Domain Controller

0 comments
 
In Windows Server 2012, dcpromo has been deprecated.
In order to make the windows server 2012 domain controller we will install ADDS (Active Directory Domain Services) role from the server manager on Windows Server 2012.
First we will change the server name let say server2012dc and  the IP address 10.10.21.1 (try to avoid using default 192.168.0.1)


INSTALLING AD DS ROLE

“Before You Begin” screen provides you basic information such as configuring strong passwords, IP addresses and Windows updates.
On Installation Type page, select the first option “Role-based or Feature-based Installation“.
Scenario-based Installation option applied only to Remote Desktop services.
On the “Server Selection” Page, select a server from the server pool and click next.
To install AD DS, select Active Directory Domain Services in turn it will pop-up to add other AD DS related tools. Click on Add Features.
After clicking “Add Features” above, you will be able to click “Next >” as shown in the screen below.
On the “Select Features” Page, Group Policy Management feature automatically installed during the promotion. Click next.
On the “Active Directory Domain Services” page, it gives basic information about AD DS. Click Next.
On the “Confirmation” Page, You need to confirm this to continue with this configuration. It will provide you an option to export the configuration settings and  also if you want the server to be restarted automatically as required.
After clicking “Install” the selected role binaries will be installed on the server.

After “Active Directory Domain Services” role binaries have been installed and now it is time to promote the server to a Domain Controller.


TechNet Article:

PROMOTING WINDOWS 2012 SERVER TO DOMAIN CONTROLLER

To create a new AD forest called “ArabITPro.local”, select add a new forest.
Type the name ArabITPro.local
Specify the FFL, DFL, whether or not it should be a DNS Server and also the DSRM administrator password. As you can see, it has selected the GC option by default and you cannot deselect it. The reason for this is that is the very first DC of the AD forest and at least one needs to be a GC.
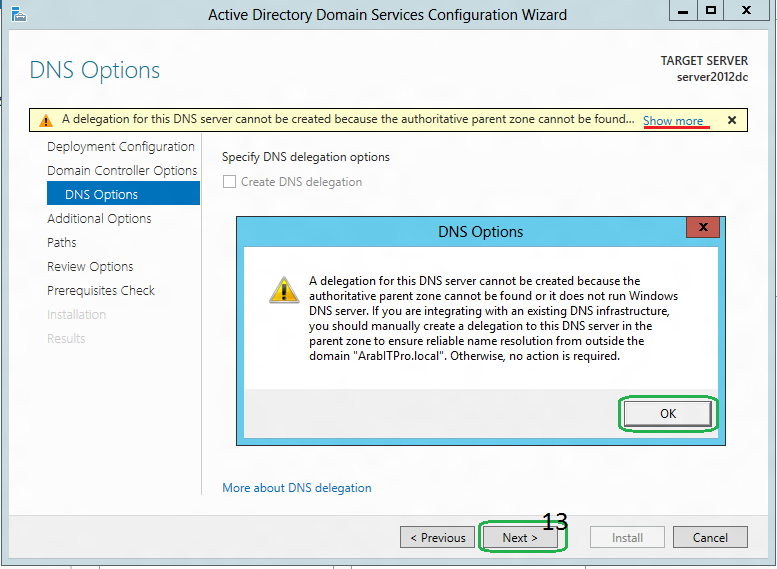
DNS delegation warning.
Checks the NetBIOS name already assigned.
Specify the location of the AD related folders and then click next.
Summary Of All Installation Options/Selections.
Click View script for single command  line PowerShell script for dcpromo.
Before the actual install of AD, all prerequisites are checked. If All prerequisite checks are passed successfully then click Install.
When you click Install, DNS and the GPMC are installed automatically.
After the promotion of the server to a DC finished server restart automatically.
Once the server is booted and you logon to it, click on  Server Manager | Tools ,  will notice that following have been installed :
   •   Active Directory Administrative Center
   •   Active Directory Domains and Trusts
   •   Active Directory Module for Windows PowerShell
   •   Active Directory Sites and Services
   •   Active Directory Users and Computers
   •   ADSI Edit
   •   DNS
   •   Group Policy Management

Readmore...
Monday, 28 October 2013

How to Team Your Network Cards in Windows Server 2012

0 comments


Windows Server 2012

The great thing about NIC teaming is that it is included in the box, free, and will work on any NIC that works with Windows Server 2012. It is remotely configurable and remains the same process no matter what card you use. Obviously you need a server and at least two NICs.

A team in Server 2012 can comprise two or more NICs from one or more vendors. The team can be added to after creation, and this is achievable from a Windows 8 client remotely on a Server 2012 machine - with or without a GUI on the server. The whole process is underpinned by PowerShell 3.0.
For the purpose of this guide, I will have three servers:
1. DC and DHCP server (single NIC)
2. Hydrangea (to be teamed, member of the domain)
3. Dahlia (to be teamed, member of the domain)
Of course all of this can be achieved using Virtual Servers. My setup was carried out on a Dell Laptop using Windows 8 RTM with Hyper-V.

Where to begin

It would be normal to use static IP addresses for all servers (or most of them), and certainly on a team of NICs. It is just as easy to use DHCP too, Server 2012 will allow that and I will use DHCP to ease the configuration.
So make sure you have a functional Server 2012 with a DHCP scope available to it (can be installed as a role on the server, or be available somewhere else on your network). If you have no DHCP, then you will need to manually assign IP addresses to your teams when you create them.
As a quick test of your current network configuration, run PowerShell 3.0 and enter the following commands:
RESOLVE-DNSNAME Hydrangea
RESOLVE-DNSNAME Dahlia
(The results of these Cmdlets show that each server has two NICs and two IP addresses - showing that the NICs are NOT teamed).

Now team the NICs on each server

This can be performed remotely from the DC. Run Server Manager and select All Servers, right-click Hydrangea and select Configure NIC Teaming, the dialog box that is presented allows all teaming activities.
Ensure the server is selected under Servers, and under Teams select Tasks and click on New Team.
Enter the Team Name - I used the creative name of "Team1" - then simply select the NICs you want to include in your team (minimum of two). Then select Additional Properties to choose how you want to set-up your team.
Now here are the really powerful settings. You can choose to be Switch dependent or independent, if redundant switches are important to you. You can choose if you want a standby adaptor or if you want all adaptors included and active. Finally, you can choose the VLAN you want this Team to operate on.
Select your options (Switch independent, None [for standby] and Default VLAN), then click OK. This will take a couple of minutes and will cause a loss of connectivity to the server you are managing (you are changing its IP address). To reconnect, you need to delete your local DNS cache and refresh server manager and all will be well (PowerShell – enter Clear-DNSClientCache and Resolve-DNSName ). This will show that you now have only one IP address and a single interface.
Repeat this set of steps on your second server. You now have a pair of teamed servers.
windows server 2012 adapters
The way to test the teaming is quite simple, but does involve more PowerShell 3.0
windows server 2012 nic teaming
First, on your equivalent of my Hydrangea server, run a PowerShell window and type Ping -t DC (where DC is your DC server name) this will keep pinging the DC until you tell it to stop, leave the window open.
Open another PowerShell window and set it side-by-side with the ping window. My NICs were called LAN and LAN2, you will need to use your correct naming in the below commands:
Get-netadapter
Disable-NetAdapter –Name “LAN” –Confirm:$False
After the first disable command – notice that the ping is still working fine
Disable-NetAdapter –Name “LAN2” –Confirm:$False
and only fails after the second disable command.
Enable-NetAdapter –Name “LAN” –Confirm:$False
Enable-NetAdapter –Name “LAN2” –Confirm:$False
Once NICs are re-enabled, all goes back to normal (in-fact comms are restored when the first NIC is re-enabled).

Summary

Prior to the release of Windows Server 2012, to be able to implement NIC teaming required several prerequisites:
1. NICs of the same make and model, and often of the same firmware revision
2. Third-party drivers built specifically for teaming
3. Skills in configuring the specific NICs and drivers.
With this groundbreaking release, Microsoft has provided all the functionality in the box for free – and removed all of the above.
Your NICs can be any make, model or revision; provided it works with Server 2012, the drivers all have the functionality built in.
The real USP is the fact that this can be done remotely on any number of servers through Server Manager and of course through


Readmore...
Monday, 12 August 2013
0 comments
 

Windows Server 2012 Tutorial

Windows Server 2012 is the next generation of Windows Server series. This OS is built around the concept of hybrid IT infrastructure, bringing together on-premise, private and public cloud infrastructure. Windows Server 2012 features multitenant infrastructure that allows system administrators to build private clouds cost effectively while giving you the ability to integrate with public clouds. Windows Server 2012 use a common identity management framework to integrate with public cloud. Efficiency of management is increased by allow full lights-out automation aiming for headless server design. Windows Server 2012 will drive forward, especially in terms of helping IT organizations advance beyond virtualization to build private cloud services. Enough marketing material, let’s get into Installing Windows Server 2012 dev preview. As you can see from the screenshot of these tutorials, they are not based on the Windows Server 2012 RTM version. Microsoft still hasn’t announced the release date. Below you will find tutorial on Active Directory Certificate Services, Active Directory Domain Services – AD DS, Active Directory Federation Services, Active Directory Lightweight Directory Services – AD LDS, Active Directory Rights Management Services – AD RMS, Application Server, DNS, DHCP, Hyper-V and more.
Windows Server 2012

BASICS
> Features removed from Windows Server 2012
> Windows Server 2012 Requirements
> Windows Server 2012 Versions Compared

GETTING STARTED
> Installing and Configuring Windows Server 2012
> Navigating Windows Server 2012
> Navigation through Windows Server 2012 Server Manager
> Windows Server 2012 Deployment Guide

ACTIVE DIRECTORY
> Promote Windows Server 2012 to Domain Controller
> Windows Server 2012 Active Directory Domain Services
> Managing Active Directory in Windows Server 2012
> Can I Clone Windows Server 2012 Domain Controller?
> Active Directory Federation in Windows Server 2012
> New Group Policy Features in Windows Server 2012

STORAGE
> Windows Server 2012 as Highly Available NAS Appliance
> Configuring iSCSI Target with Windows Server 2012
> File Access Control in Windows Server 2012
> Windows Server 2012 Resilient File System Explained
> Dedup and Windows Server 2012
INFRASTRUCTURE
> Intro to Windows Server 2012 IPAM
> Windows Server 2012 and DNSSEC
> Windows Server 2012 WAN Optimization Features
> Windows Server 2012 BranchCache Basics
> DHCP High Availability with Windows Server 2012
> Migrating Services from Windows Server 2008 to Server 2012
> Windows Server 2012 AD CS New Features
> Windows Server 2012 PowerShell Scheduling Features

SECURITY
> Configuring BitLocker in Windows Server 2012 Environment
> Configuring Password Policies with Windows Server 2012
> Building your PKI Infrastructure with Windows Server 2012
> New RMS Features in Windows Server 2012
Readmore...