Pages

Banner 468

Showing posts with label How to improve my wireless speed or range. Show all posts
Monday, 2 December 2013

How to Configure my Range Extender

0 comments
 

How to Configure my Range Extender

Suitable for: TL-WA730RE, TL-WA830RE
Before configuration, please get the right information of the Root Router as below:
Information of Root Router:
  •  LAN IP: 192.168.1.254
  •  SSID: 2WIRE_TEST
  •  Encryption Type: WPA2-PSK with AES
  •  Passphrase: testtplink
Preparation
  • Since the DHCP function on the Range Extender is disabled by default, we have to manually assign an IP address as 192.168.1.x to the computer to match the default IP address of the Range Extender. Please click here for detailed instruction. For TL-WA830RE, its LAN IP is 192.168.0.254, please assign 192.168.0.x for you computer.
  • Connect the computer to the Range Extender with an Ethernet cable. And disconnect the wireless from the root router.
Configuration on Range Extender :
1.    Log onto the Range Extender’s management page. Please click here for the detailed instruction;
2.    Click Network. Please make sure the Range Extender's IP address is in the same IP segment with the Root Router and avoid the IP conflict. In this instance, we can change the IP to "192.168.1.250". Then click Save.
Notice: If the root router is not in the IP segment 192.168.1.X, for example, it is 192.168.0.254.you need to change the IP of the Range Extender to 192.168.0.250. and after clicking on Save, please change the IP of your computer to 192.168.0.100. and then log in the Range Extender’s management page by using the new IP 192.168.0.250.
3.    Click Quick Setup, Click on Next->Wireless. Select Range Extender as the Operation Mode. Then click Search.
4.    Find the Root Router's SSID on the list, and then click Connect.
5.    Click Save.
 
6.    Click Wireless -> Wireless Security. Select WPA-PSK/WPA2-PSK, and Encryption AES. input the password "testtplink" in the PSK Password field. Then click Save. The Security settings on the Range Extender must be the same as the root router. Please contact the support of the router to check it if you are not sure.
After you go through all the above steps, the Range Extender should get working properly with the Root Router.
How to confirm:
Go to System Tools->Diagnostic,in the IP address(or IP address/Domain Name) bar type in the root router’s IP 192.168.1.254, click on the Start on the bottom.
And the last step is to set the computer to obtain the IP addre
Readmore...
Tuesday, 19 November 2013

Router Tips to Make Your Wireless Faster

0 comments
 

The router is the technological workhorse of the modern home, bringing Internet to your many devices. A router’s wireless speed is usually a user’s main concern: Unlike wired networks, wireless networks seem to suffer interference from objects in our everyday lives--should the router be above the dryer, or below; next to the microwave, or above? Wireless speeds can also be affected by too many devices sharing the same access point as well. Your device is fighting for limited bandwidth.

Many basic ways to improve your Wi-Fi network are available, such as placing the router in the center of the area you want it to cover, keeping the router away from metal objects that could block the signal, or making sure there aren’t too many other radio-enabled devices broadcasting on a 2.4GHz signal (standard for most older routers). But other ways to improve your signal may be a little less apparent. Here are some of those tricks (feel free to add your own workarounds in the comments below).

Check Your Speed
Although most people can gauge if their home wireless is too slow or not, checking the speed of the connection will let you know for sure whether you’re within range of the speed promised by your provider. Downloading a lightweight piece of software like LAN Speed Test gives you upload and download speed numbers in megabits per second (mbps), which you can check against your ISP’s promised speed to see if your network is actually slow or if you just need to pay for faster service. You’ll probably need to run the test multiple times and at different times of the day to get a real sense of how fast your Wi-Fi is overall, as crowding on the 2.4GHz spectrum could cause slowdown during the busiest times of the day for Internet traffic.

Change the Channel

If your wireless is weaker than it should be, you can try manually adjusting the broadcast channel to find one with fewer wireless routers competing for space. If your router is relatively new and automatically chooses which channel to broadcast from, then you won’t get too much use out of pinning your wireless down to a single channel, but for older routers it’s worth looking into.

First you’ll want to go into the router’s graphical user interface (GUI), by typing the router/gateway address into the address bar in a browser window while your computer is connected to the router’s wired or wireless network. You can usually find the router’s address on the router itself, in the instruction manual, or online if all else fails. For example, if you have a D-Link router, you’ll type http://192.168.0.1; if you have a Linksys, you’d type http://192.168.1.1. The browser will prompt you to enter your user name and password.

The exact navigation through the GUI for each router is different, but once you find the router’s wireless options (usually under headings like “LAN” or “Network”), you should see a “wireless channel” option. In North America, you can broadcast from channels 1, 6, and 11. Try switching to one of those three channels that’s not currently in use and see if it speeds things up.


Add Some Hardware Changing the actual hardware that makes the wireless signal waft through your house is an easy way to strengthen a wireless signal throughout a larger area. While most routers come with omnidirectional antennae (meaning they broadcast signal in all directions), you can also invest in a single-directional antenna that should double the strength of your signal, but only in one direction. This is great if you must place your router by a wall, and you don’t want to waste resources transmitting half of the wireless signal through the wall or window. Single-directional antennae can cost anywhere from $20 to $120.

Wireless repeaters do a similar thing, basically just repeating the signal put out by your router and helping you cover more space with Wi-Fi. These also cost around $20 for a low-end repeater, but if you’re up for a little DIY you can make your own wireless repeater for free by uploading custom firmware from DD-WRT to an old router (step-by-step instructions here, and an explanation of DD-WRT below).

Another hardware-related change: if you have multiple rooms you need to cover with your signal, consider buying a hybrid Homeplug/ wireless router device. Homeplug technology uses the AV line in your house to transmit broadband signals to other rooms, and if you include a wireless router on the adapter, you’ll have a Wi-Fi signal right there in the room with you.
Check Who’s on Your Network
You never want to leave your wireless signal without at least some sort of protection, and it’s worth noting that there are different levels of security on every router. Again, you’ll want to go to your router’s GUI and check its wireless security settings. Often, there will be a drop-down or click-to-select menu to allow different levels of security. WEP is the weakest form, and is easily broken; WPA is much more secure; and while WPA2 is the most secure, it can sometimes be incompatible with older devices on your network, so WPA is probably the best bet if you’re not sure what you want.

Again, somewhere in your router’s configuration (under “wireless” or “status”) there should be a list of devices that connect to your system. Keep in mind that this list of devices will also include the laptops and smartphones of any guests who used your Wi-Fi recently, or any cameras, printers, or other Wi-Fi enabled devices that you might use around the house. If you’re unsure, you can match the Media Access Control (MAC) addresses listed on the router GUI with the MAC addresses of your various devices.

If you do find intruders, you could change your wireless password, or some routers will allow you limit the number of devices that can connect to your network. Of course, there are programs out there that will allow you to triangulate the location of the moochers based on network signals. While the legality (and sanity) of trying to track down people who are using your Internet is questionable (and not sanctioned by PCWorld) there would probably be nothing wrong with knocking on your downstairs neighbor’s door and politely asking them in person to get off your Wi-Fi. There is, of course, the famous “Upside-Down-ternet” gag, where you turn the Wi-Fi thief's browser pages upside down, or make their browser pages blurry, or replace them with kittens! While it sounds fun, it’s a pretty advanced trick, so the average user might want to switch to WPA security and password-protect the network instead.


Adult Site Blocking With Open DNS
OpenDNS can block phishing attacks and adult sites.
Many new routers come with parental control options built into the device’s features. If you have an old router, however, you can use a service like OpenDNS. When your browser receives the command to retrieve a URL, it must go through a DNS server, which will look up the site’s numeric IP address. OpenDNS uses it’s own DNS lookup technology to resolve your browser’s page, meaning it can often bring up a web page faster. But one of the big perks for parents is that it also can block phishing attacks and adult sites that might get your kids in trouble.

OpenDNS doesn’t even require that you subscribe with them (the free version is ad-supported). Simply go to your router’s GUI and switch from an auto-generated IP address to a static IP address; then in the fields for DNS (there are usually 2 to 4 spaces for you to add a DNS lookup number), enter OpenDNS’s look-up numbers, which you can find on the OpenDNS site. Doing this from the router, rather than just configuring OpenDNS on a specific computer, will protect all the computers connected to that router.


Install Updated or Custom Firmware If you have an older router, or the settings on your new router don’t offer all the functionality you’d like, try upgrading your router’s firmware. Often, your router manufacturer will have firmware updates that you can easily download from the manufacturer’s website. And if you really want to supercharge your router, you can even upload custom firmware provided by DD-WRT.

While a lot of newer routers offer out-of-the-box DD-WRT compatibility, you can check on the DD-WRT website to see if your older router is compatible with the custom firmware. Upgrading can mean better firewalls, the ability to designate how much bandwidth each device on your network gets, and even client isolation, so that wireless users can connect to the network without being able to see each other (an important part of hosting a public access point). Follow the directions on the site to flash your router with DD-WRT, and then use it to modify your router to fit your needs.


Hybrid Modems/Routers Aren’t Off Limits
If your Internet service provider requires that you install a hybrid modem/router, you can try adding another router onto the system to get different functionality.

When I moved into a new apartment recently, I decided to subscribe to AT&T Uverse, which uses fiberoptic cable to bring the Net to your computer. AT&T requires subscribers to use a hybrid router/modem, and in my case the company installed a 2Wire 3800HGV-B modem/router. The Wi-Fi was okay, but the device had an 802.11g wireless access point, and I wanted to try my newer TRENDnet TEW-691GR router, which had an 802.11n access point.

In order to broadcast wireless from the TRENDnet router, I modified the two routers to work with each other. First, I went to the 2Wire’s summary status page, and under “Internet Details” recorded the primary and secondary DNS numbers, and also the range of the IP addresses listed under “Private Network DHCP info”, which in this case happened to 192.168.1.64 - 192.168.1.254.


A TRENDnet router's settings page. (Click for larger image.)
Then I connected an ethernet cable to a LAN port on both the 2Wire modem/router and the TRENDnet router, connected the TRENDnet router to my computer with another ethernet cable, and entered the TRENDnet configuration page. I navigated to “network” and “WAN setting” (although with other routers you might just look for the option to change the connection type and the DNS server setting). I changed the connection type to “Static.” In the field for IP address, I entered a number within the range given above; in the “subnet mask” field, I entered 255.255.255.0; and in the “default gateway” field, I entered the original 2Wire router/modem’s gateway address, as found on the router itself. Then, under DNS Server Setting, I entered the primary and secondary server settings that I found in the 2Wire’s configuration page. I saved everything, then went back to the 2Wire device.


A settings page of a 2Wire modem/router for AT&T's U-verse service. (Click for larger image.)
In the 2Wire’s configuration page, I first went to “system info,” then “Event Notifications,” and checked “enable detection of router-behind-router conditions.” Then, I navigated to the “Broadband” tab and clicked “link configuration.” Under “add additional network,” I checked “enable” and gave the TRENDnet router’s address (which I had used earlier to enter the TRENDnet’s GUI ) and the subnet mask 255.255.255.0. Don’t forget to keep saving your settings.

With the TRENDnet router still connected by a LAN port to the 2wire’s LAN port, both devices should be on and giving a wireless signal. When you can connect to both wireless networks successfully (you may have to close out of your browsers or do a “power cycle” by turning both the routers on and off), then you can go into the 2Wire’s modem/router menu and disable the “wireless” tab.

At this point, no wireless signal is coming from the 2wire, and all of the wireless transmitted in my apartment is at 802.11n standards. This workaround seemed to make my wireless slightly faster, but more unreliable. The network connection would suddenly crash, but when it was up and stable I seemed to be able to download videos faster. I would recommend activities of this type for experimentation only, as I ultimately just went back to the more stable 2Wire wireless network.
Readmore...

Tips to Boost Wireless Speed, Range, and Reliability

0 comments
 
Wireless internet is awesome…When it’s fast, reliable, and has wide coverage that is.  When the signal keeps dropping or the speed is so slow you might as well be on dial-up, it’s another story. Frustrating might be a mild description of the emotions a cruddy wireless network can evoke.
Thankfully, there are a number of easy, and completely free, tricks to get your WiFi working like a champ.  We wrote this guide so even those “technologically challenged” among us can run through it in a few minutes.
But, before you dive in, you will need to login to your router using a web browser. Lucky for you, we’ve got a simple guide called “How to Login to a Wireless Router” that will lead you through the process.
Once signed into the router, you might have to click around a little bit to find the settings we need to adjust. Generally, you are looking for some sort of “wireless settings” or “advanced wireless settings” page. Don’t be afraid to poke around a little bit. We’ll let you in on a little secret. The all-knowing and oft nerdy IT people actually aren’t all-knowing. Quite often they have no idea how to solve a problem. However, they are willing to click around until they find the setting they are looking for.
Most computer wary people just need a confidence boost. Need some help getting the gumption to tackle this task? No problem. Here’s 13 things to make your day better. Okay, now we’re ready to kick some wireless butt.
Note: This tutorial assumes you already have a wireless router setup and that the computer you are using is connected to that network (hardwired connected is preferable). It is also written specifically for 802.11B/G/N devices. All of the tips are also applicable to 802.11AC, but the instructions may be slightly different.

1. Optimize wireless router location

Probably the easiest and most important improvement you can make is physically moving your router. Try a centralized location in your home. If it’s a two story home with a basement, put the router in the middle of the home on the first floor. Keep it away from devices that can interfere with a wireless signal, like a microwave or cordless phone. Also keep it away from foundational walls and out of cabinets. Don’t shove it at the bottom of an AV rack stuffed with home theater equipment or in your utility room. Your ultimate goal is to maximize coverage in the home by keeping the router away from things that might block or otherwise interfere with the signal. Try out a few different locations and then walk around your home with a wireless device and see how the signal changes.
Each time you move the router, you will want to record what the signal strength is and perform a speed test. This allows you to be more precise and strategic about the process, particularly in later parts of this guide. You can test the signal strength simply by observing how many bars your device shows. For those wanting the most accurate results possible, consider downloading the program inSSIDer. It allows you to see the wireless channel and signal strength of all of the wireless networks within range.

2. Hard wire as much as possible

This is a pretty simple suggestion. The fewer devices on a wireless network, the faster the network is likely to run. Not to mention that a hardwired connection is faster and more reliable in the first place. This process may involve moving some of your equipment around so you can get an Ethernet cable to it from the router. If you know your way around CAT cabling, you might check to see if the phone lines in your home are wired using CAT 5 or CAT 6. If they are, you could use the phone cables throughout your home to hard wire devices (heck, even CAT 3 can be made to work). You might also consider using an Ethernet over powerline adapter explained in our article on how to add wireless to hardwired devices.

3. Disable old wireless protocols

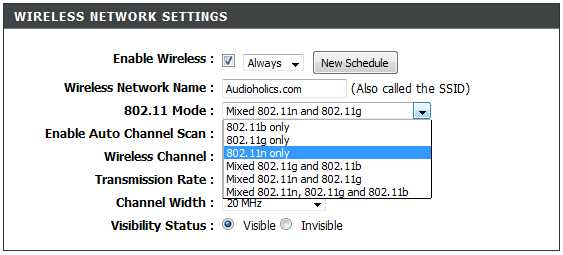
Even though your fancy new router may be super-fast with 802.11n (or even 802.11ac), as soon as a device connects using an older protocol, say, 802.11g, the entire network slows down. The fix to this problem is to set the router to only broadcast newer wireless modes. For your reference, the speeds from slowest to fastest are: b, g, n, ac. Notice in the picture below that you can select which modes you want the router to work with.

wireless protocal g/n 
Disable Old Wireless Modes
If all of the devices on your network support wireless n (802.11ac is faster, but most devices don’t support it yet), then select “802.11n only”. Unfortunately, this will kick any devices not compatible with wireless n off of the network. You can either:
A) stop using the older devices.
B) upgrade their wireless cards, if possible.
C) hardwire them to the router instead of connecting wirelessly.
D) select a mixed operation mode (like 802.11g + n), or E) purchase a dual band router.
Dual band routers are like having two routers built into one (close enough, anyway). They can broadcast two separate wireless networks simultaneously. This means that you could setup a wireless g network for you older devices, and a wireless n network for newer devices. This allows the older devices to connect to WiFi without slowing down newer devices. But don’t get too excited yet. Dual band routers operate by sending out the two wireless networks on different frequencies, one at 2.4Ghz, the other at 5Ghz. Many new wireless devices still do not work on a 5Ghz network, even if the device is 802.11n compatible. Additionally, 5Ghz wireless networks have poorer range than 2.4Ghz networks. You will want to do some research to find out which devices of yours actually support 5Ghz before investing in a dual band router. With that said, if you are planning on buying a new router anyway, go with a dual band router.

4. Use WPA2 security only

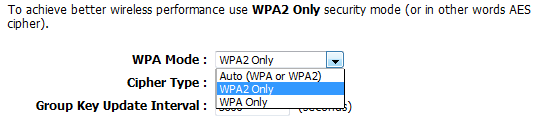
WEP encryption used to be the standard when it came to wireless security. However, now it’s not only a poor form of protection, but it can limit the speed of your network. The same goes for the more modern WPA standard. If possible, you should limit your router to only work with WPA2 encryption.
wpa2 security only
Wireless Encryption Settings

5. Change the wireless channel

You’re certainly not the only person on the block with wireless internet and routers only operate on a limited number of channels. Multiple routers operating on the same channel can cause all sorts of issues, including dropping a wireless signal all together.
First, go to an area you normally have wireless problems. If there aren’t any real problem areas, just move a few rooms away from the router.  Before changing anything, test the signal strength and speed, like you did when determining the best location for the router. This gives us a baseline and allows us to gauge the effects of any change we make.
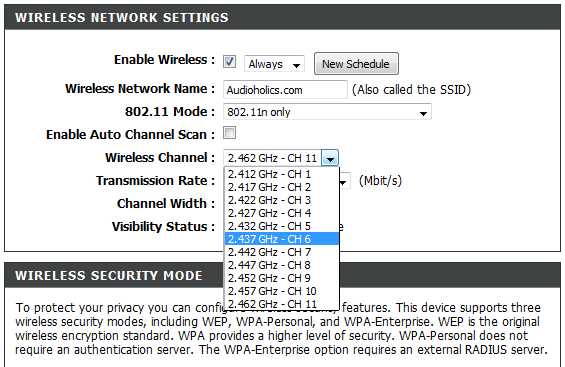
wireless channel
Wireless Channel Setting
Most routers set the channel to “auto” by default. Find the channel setting in the router menu, and select the lowest option (CH 1 for 2.4gHz networks), then go back and check the signal strength and speed again. Repeat this process with a few different channels. I typically only test the lowest, middle, and highest channels. Once you have found the channel that gives you the best performance, select it and save the settings.

6. Change channel width

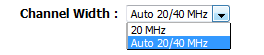
As wireless protocols have advanced, one of the ways they have increased speed is by operating using wider wireless channels. Wireless n routers need to use a 40Mhz channel width in order to achieve maximum speed. Most routers come with 20MHz as the default width, this is in an attempt to avoid interference. So, there is a potential for this change to negatively affect some users. If you start to notice issues, switch back to a 20Mhz operation. Also note that this isn’t really for increasing how fast you browse the internet, this change is more likely to be evident when streaming/transferring files between devices on your network.
Simply find the “Channel Width” setting in your router’s setting and change it to “Auto 20/40MHz”.
wireless channel width
Channel Width

7. Use your DIY skillsDIY Antenna - courtesy of Lifehacker.com

If all of the by-the-book solutions fail, then think outside the book (or box). One of the most common DIY methods for creating a killer wireless network is to upgrade the firmware of your router to a version that allows you to boost output. The most common router used for this in an older version of the Linksys WRT54G, and the firmware is called “Tomato”. Lifehacker actually has a pretty good tutorial on the entire process. Keep in mind that not all routers are compatible with alternate firmware.
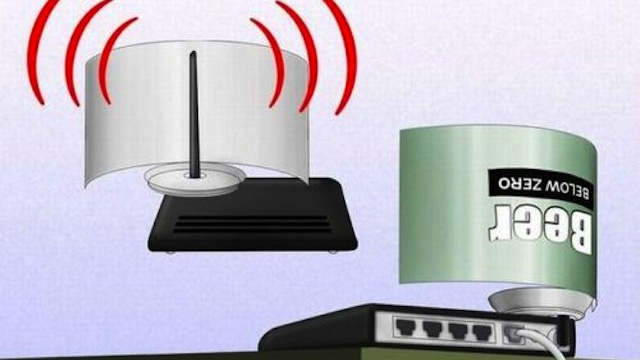
A second DIY option is to modify the antennae on the router. This is most easily done on routers with visible external antennae. If the original antennae can be unscrewed, purchase larger antennae and install them in place of the default set. Another option is to cut up a pop can or aluminum foil and direct the antenna signal in one direction, much like a satellite dish.

Conclusion

Following these 7 steps should allow you to get the most out of your wireless network. In some cases, you will notice huge benefits. For other people, who already have a solid network or don’t perform any bandwidth intensive tasks, the benefits might be more subtle. Either way, these tips should be considered best practices for setting up any wireless network.

Readmore...
Wednesday, 2 October 2013

How to improve my wireless speed or range

0 comments
 
Cause:
The factors most frequently affecting the wireless signal:
1)    Intrinsic factors:
·Transmission Distance.
Regarding on the wireless device particularly working on 5GHz band, it will be more sensitive to the obstacle. Though there will be more clear channels than those of 2.4GHz bands, the wireless signal will be reduced significantly and transmit in shorter range due to higher frequency.
 
·Antenna.
Omni-directional antennas and directional antennas
Omni-directional antennas are resembled in our home products like wireless router or wireless ADSL2+ Modem Routers, they radiate horizontally all around, but are weaker upward or downward as the picture shows.
 
While a directional antennas radiate strongly in a particular direction which are usually used for high power outdoor products. The gain of a directional antenna increases, also with the coverage distance, but the effective coverage angle decreases. Generally, the higher gain value of an antenna, the better directional ability will be.
 
For directional antennas, the lobes are pushed in a certain direction and little energy is there on the back side of the antenna. Please refer the picture below.
 
This phenomenon will be more significant once you deploy the High-Gain antenna, so we recommend that to confirm precise on horizon direction otherwise there be unexpected dramatic signal loss.
 
·Wireless Communication Performance.
The higher performance transmission rates, the better ability.
 
2)    Extrinsic factors:
- Physical Barriers, such as wall or clapboard and so on;
- Other similar devices and other sources such as microwave ovens, cordless phones or other technologies that use the same band as Bluetooth or security devices
- There are more than one AP or wireless routers working in the same Channel.
- The location where an AP or wireless router is placed. Do your better to place the device at a higher location to reduce the barrier’s countercheck.
 
 
Solution:
Here are some solutions to improve the weak wireless signal as the reference, some problems caused by the inherent property of wireless connection, only can work around,
 
1) Antennas should be positioned for best location and direction
-  Deploy the antenna in good location and correct angle, and also make sure your wireless client devices are in the coverage;
-  For multi-story buildings wireless coverage, we recommend to placing antennas at 45 degrees (diagonally) or 0 degrees (straight out parallel to the floor) which will be more effective. Since antennas always transmit weakly at the base, do not place your wireless client device at the bottom of TP-LINK wireless router or access point.
 
Please check the following picture as reference and you can find easily that A point is recommend while B or C is in not good location.
 
      2) Try best to avoid the extrinsic interference
- Avoiding the physical interference in the wireless coverage, each wall or ceiling will have a negative effect on wireless radio particularly the ones built by solid metal material ;
- Keep your device away from various electromagnetic noise sources that generate RF noise, like microwaves, Monitors, electric motors, copying and fax machines, etc.
 
 
- For TP-LINK wireless products, we recommend to do corresponding settings to avoid the interference from other networking and radio frequency equipment.
 
First, please log into the product and you can refer to this link as guidance. Here we take TL-WR1043ND user interface as an example and then please go to Wireless->Wireless settings and change the channel settings, the default value is Auto and here we recommend select 1, 6 or 11 if you suffer high wireless interference.
 
For 802.11b&g, there are 14 channels designated in the 2.4 GHz range and three non-overlapping channels recommended: 1, 6 and 11 (1, 7 and 13 in part European region, please obey your local regulations or laws).
 
Sometimes the “well-known” channels will be also crowded and we recommend to select the appropriate one adjusted to your local environment.
 
l
Readmore...