Pages

Banner 468

Showing posts with label Netgear Firewall configure. Show all posts
Friday, 24 January 2014

How to setup Inbound/Outbound firewall

0 comments
 

How to setup Inbound/Outbound firewall rules on NETGEAR Modem router/gateways

Symptoms: 
  • Cannot connect or access LAN devices or applications from the Internet (i.e.: FTP server, HTTP server, Podcast server, etc...)
  • Cannot play online games through NETGEAR Modem Routers
  • The NETGEAR firewall prevented certain applications to work correctly over the Internet
Resolutions:

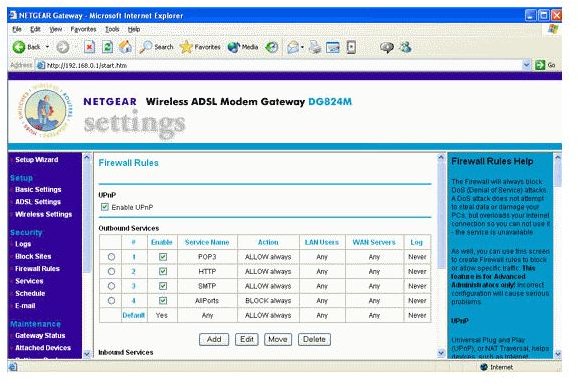
By default, the NETGEAR Firewall rules will block and prevent any unauthorized access to your Local Area Network (LAN).  Remote access to the LAN devices or applications will only be possible after an inbound or outbound firewall rule is added to the router/gateway.  Inbound firewall rules are set of rules that would allow or permit access to the LAN services from the Internet -- the default rule blocks all incoming service requests.  On the other hand, Outbound firewall rules would prevent or deny access to the Internet from the LAN devices -- the default rule allows all outgoing traffic. 
The steps below will show you how to configure inbound/outbound firewall rules:
1. Open Internet browser and access http://192.168.0.1 or http://www.routerlogin.com.  
2. Enter admin for username and password for password. If you have changed the default password, please enter your customized password when prompted.
3. On the left panel under Security (Content Filtering, for older devices) , click Firewall Rules. 
4. Click the Add button under the type of rule (Outbound or Inbound) that you would like to add.
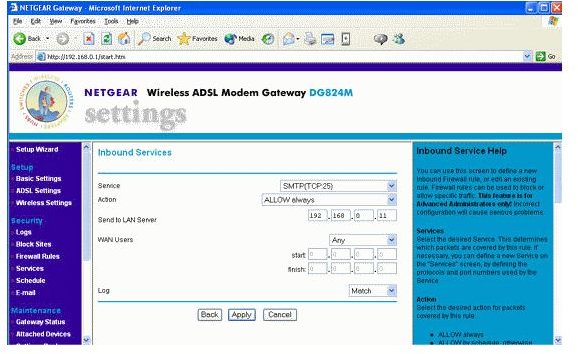
5. Select the desired Service from the list.  If necessary, you can define a customized service.  To add a new customized Service, follow these steps:
    1. On the left panel, under Security (Content Filtering for older models), click Services.
    2. Click the Add Custom Service button.
    3. Create a Name for the new service
    4. Select the Type of protocol that the service will be using.
    5. Enter the Starting port and Ending port
    6. Click Apply to finish adding the new custom service.
6. Under Action, select the appropriate action for packets covered for this rule.
  • Note: To define the Schedule used in these selections, use the "Schedule" option listed on the Security or Content Filteringsection.
7. Under the Send to LAN server field, enter the IP address of the PC or Server on your LAN which will receive the inbound or outbound traffic covered by this rule.
8. Select an option for WAN Users. This setting determine which packets are covered by the rule, based on their source (WAN) IP address. Here are the options:
    • Any - All IP addresses are covered by this rule
    • Address range - If this option is selected, you must enter the "Start" and "Finish" fields
    • Single address - Enter the required address in the "Start" fields.
9. Select an option under Log. This determines whether packets covered by this rule are logged. Select the desired action.
    • Always - always log traffic considered by this rule, whether it matches or not. (This is useful when debugging your rules.)
    • Never - never log traffic considered by this rule, whether it matches or not.
    • Match - Log traffic only it matches this rule. (The action is determined by this rule.)
    • Not Match - Log traffic which is considered by this rule, but does not match (The action is NOT determined by this rule.)
10. Click on Apply button.

This applies to:
     > Netgear MBR624GU, DGND3300, DGN2000, DG834G and DG834N.


Readmore...
Sunday, 6 October 2013

Windows 7 Firewall

0 comments
 

Windows 7


Checking for Windows 7 Firewall


To see if Windows 7 Firewall is running:

1. Click the Windows icon, and select Control Panel. The Control Panel window will appear.
2. Click on System and Security. The System and Security Panel will appear.


3.Click on Windows Firewall. The Windows Firewall panel will appear.


4. If a green check mark appears, Windows Firewall is running.


Configuring Windows 7 Firewall


If Windows Firewall is running and Immunet Protect is indicating "Offline Mode" problems, take the following steps:

1. On the left side of the Windows Firewall panel, click the Allow a program or feature through Windows Firewall link. The Allowed Programs panel will appear.


2. Click the Change Settings button.


3. Find Immunet Protect in the list of programs. If it appears in the list of programs, select Immunet Protect (or agent.exe) and click the Remove button. Confirm that the entry should be removed (the next steps will re-install the program). If Immunet Protect does not appear, then proceed to the next step.

4. Click the Allow another program button. The Add a Program window will appear.


5. In the Add a Program window, click the Browse... button.

6. Navigate to the Immunet Protect program directory (e.g. C:\Program Files\Immunet Protecrt\2.0\) and double-click on agent.exe.

7. Click the Add button.

8. Do this same for updater.exe.

9. Click the OK button to close the Allowed Programs panel.

Windows Vista


Checking for Windows Vista Firewall


To see if Windows Firewall is running:
1. Click the Windows icon, and select Control Panel. The Control Panel window will appear.


2. Click on the System header. The Security Panel will appear.


3. Click on the Windows Firewall header. The Windows Firewall panel will appear.


4. If a green check mark appears along with the message Windows Firewall is helping to protect your computer, Windows Firewall is running.

Configuring Windows Vista Firewall


1. On the left side of the Windows Firewall panel, click the Allow a program or feature through Windows Firewall. The Windows Firewall Settings window will appear.


2. Find Immunet Protect in the list of programs. If it is there, click to select it. If not, skip the next step.

3. With Immunet Protect selected, click the Delete button. Confirm that the entry should be deleted.

4. After removing the Immunet Protect entry or if Immunet Protect does not appear in the list of programs, click the Add program... button. The Add a Program window will appear.


5. In the Add a Program window, click the Browse... button.

6. Navigate to the Immunet Protect program directory (e.g. C:\Program Files\Immunet Protecrt\2.0\) and double-click on agent.exe.

7. Click the Add button.

8. Follow the same steps for updater.exe.

9. Click the OK button to close the Allowed Programs panel.

8. In the Windows Firewall Settings window, click to select the General tab.

9. Ensure that Block all incoming connections is not selected.

10. Click the OK button to close the Windows Firewall Settings window.

Windows XP


Checking for Windows XP Firewall


To see if Windows Firewall is running:

1. Click on the Windows Start button, and select Control Panel. The Control Panel window will appear.


2. Click on the Security Center link.


3. In the newly opened panel, if the Firewall header says ON, Windows Firewall is running.

Configuring Windows XP Firewall

If Windows XP Firewall is running and Immunet Protect is experiencing connection problems, perform the following steps:


1. In the Security Center, click the Windows Firewall graphic.


2. Ensure that Don't allow exceptions is not selected.


3. Click to select the Exceptions tab.

4. Find Immunet in the list of programs. If it is there, click to select it. If it is not on the list of programs, skip the next step.

5. With Immunet selected, click the Delete button. Confirm that the entry should be deleted (the next steps will re-install the program).

6. Click the Add Program button.


7. In the Add a Program window, click the Browse... button.

8. Navigate to the Immunet Protect program directory (e.g. C:\Program Files\Immunet Protecrt\2.0\) and double-click on agent.exe.

9. Click the OK button to close the Add a Program window.

10. Click the OK button to close the Windows Firewall Settings window.

Readmore...
Monday, 12 August 2013

How to Turn Off Your Netgear Firewall

0 comments
 
A firewall on a router or other network device isn't always necessary. There may be times when you need to turn it off. Netgear don't make it easy, but come inside and learn how to do it!

  • Firewalls are great tools. They are like the locks on your doors and windows, keeping nefarious characters at bay. They protect you from the bad guys and do a good job of it too. They aren’t infallible, and a determined hacker can defeat them given time, but they are well worth the time and trouble of installing and configuring.
    Some users have the luxury of sitting behind a dedicated hardware firewall, or have built one out of old PC components as a project. In these cases an extra firewall on the router is probably redundant. If you’re just running a software firewall on your computer, it isn’t always enough, so if you’re considering disabling the Netgear one because you have one on your desktop, don’t. An extra layer of defense is always worthwhile. As it adds no real workload on the router, there is no harm keeping it running.
    The Netgear series of routers has a packet filtering firewall that is as effective as those of any other manufacturer. What they don’t provide though, is an easy method of switching it off. Netgear regards firewalls as so important, that there is nowhere in the GUI to disable it. We all agree that firewalls are important, and should only be turned off if absolutely necessary. So although I’m going to show you how to turn off a Netgear firewall, I won’t advocate actually doing it.
    To get around this little stumbling block we have to make a firewall rule and add it to the firewall configuration. The devices have two main rules.
    Inbound Services: Block all access outside the network except responses to requests made inside the network.

    These rules can be manipulated in order to go around the firewall. While not turning it off per se, we are negating its effect on traffic over the network.
    To do this you need to access the devices admin screen in a browser. This is usually http://192.168.1.1 or http://192.168.0.1 depending on the device. Access the administration application by entering your username and password, then navigate to the Security page, then to Rules.
    Wireless Network Rules
  • Add a new rule to the Inbound Services section with the Service name Any and the action of Allow always. Move it so it is the first rule in the section and check Enable.
    Ensure the new configuration is saved and then close the browser. Your network is now no longer protected by the Netgear firewall. Were you to change your mind and want to reinstate it, just uncheck Enable and save the configuration.
    Disable Netgear Firewall
Readmore...