Pages

Banner 468

Wednesday, 20 July 2016

Installing Reverse Proxy on Windows Server 2012 R2 (Web Application Proxy)

0 comments
 

Install Windows 2012 R2 with GUI

Install the certificate onto the server
I don't tick "Mark this key as exportable." Because this server will be internet facing.
Change the adfs dns record in DNS to point to the ADFS reverse proxy server
Update the Host file on the server to force adfs.company.co.za always to the primary adfs server.
Install the "Remote Access Roles"
Configure the Application Proxy
All done you should not be able to add additional applications to the reverse proxy.
Doing a quick test to see if ADFS is responding from a remote client using urlhttps://adfs.company.co.za/adfs/services/trust/mex
Ping adfs.company.co.za to make sure it is going to the Proxy
In Internet explorer open the url you should get xml back
I'll releasing blog articles on how to publish the following service in the future:
Readmore...

ISA Server Installation step by step

0 comments


Insert the ISA Server 2004 Enterprise CD and follow the installation instructions. You must choose to Install Configuration Storage Server. This will install an ADAM-Instance on this computer which will be used to store the configuration of ISA Server Arrays. ISA Server Array Members will connect to the Configuration Storage Server to receive the configuration.

Figure 1: Installation of a Configuration Storage Server
If you choose Install Configuration Storage Server you can see in Figure 2 that only the ISA Management Option and the Configuration Storage Server will be installed.

Figure 2: Component Selection
On the next page we must select create a new ISA Server enterprise (Figure 3). This configuration option creates a new ISA Server Enterprise during the installation.

Figure 3: Create a new ISA Server Enterprise
Figure 4 shows a warning message that Microsoft recommends only deploying a single Enterprise in your Organization. Multiple Enterprises could be hard to manage. You can deploy multiple Arrays within one ISA Server Enterprise.

Figure 4: Warning message when you install a new ISA Enterprise
The next step (Figure 5) is to name the new ISA Server Enterprise and enter a description for the new Enterprise.

Figure 5: Enter a name and description for the new Enterprise
If you are using ISA Server 2004 Enterprise in a single domain or in domains with trust relationships, you must choose the Setup Option I am deploying in a single domain or in domains with trust relationships. ISA Server will use Windows authentication for authentication purposes. If you are using ISA Servers and Configuration Storage Servers in different domains without trust relationship or in a workgroup deployment, you must use certificates to establish a secure communication channel for authentication purposes.
Attention:Keep in mind that when you deploy ISA Server 2004 Enterprise in a workgroup environment you can use only one Configuration Storage Server. The following links could also find your interest when you deploy ISA Server in a workgroup:
If you are using certificates in a workgroup deployment you must use this tool to update ADAM account settings so that they do not expire.
http://www.microsoft.com/downloads/details.aspx?FamilyID=1cbac3e5-acac-4613-9860-e1b760b9434f&DisplayLang=en
The second tool is ISACertTool.exe that helps you to do the following:
• Install a server certificate on the Configuration Storage server.
• Install a root certificate on each array member to indicate that it trusts the Certification Authority that issued the server certificate
http://www.microsoft.com/downloads/details.aspx?FamilyId=F8F60164-C5A5-4716-9FF4-2D56C86506C3&displaylang=en

Figure 6: Setup the ISA Server 2004 Deployment method
After finishing ISA Server 2004 setup, the setup opens as a last step, a website from the ISA Server 2004 installation directory, which will guide you through additional steps how to secure your Windows / ISA Server installation.
I also recommend reading the following articles from the Microsoft website:
Hardening the Windows Infrastructure on the ISA Server 2004 Computer
http://www.microsoft.com/technet/prodtechnol/isa/2004/plan/hardeningwindows.mspx
ISA Server 2004 Security Hardening Guide
http://www.microsoft.com/technet/prodtechnol/isa/2004/plan/securityhardeningguide.mspx

Figure 7: Hardening the Windows Server / ISA Server infrastructure
Before we are going to install the ISA Server 2004 Array members, we must create a new ISA Server 2004 Array. To create a new ISA Server Array start the ISA Server 2004 management console on the Configuration Storage Server, navigate to Arrays and create a new ISA Server Array.

Figure 8: Create a new ISA Server Array
We will name the Array MainArray (Figure 9).

Figure 9: Name the ISA Server 2004 Array
The next page (Figure 10) asks you to enter the ISA Server Arrays DNS name. You must enter a DNS conform FQDN (Fully Qualified Domain Name). You must create a corresponding A-record in DNS, so that Firewallclients and Webproxyclients can resolve the Name correctly. If you are using NLB you must enter the VIP (VirtualIP) as the IP address in DNS. I will give you more information about implementing NLB in another article. We will enter the Array's DNS name MainArray.cohovineyard.com.

Figure 10: ISA Server Array's DNS name
The next step is to specify which Enterprise Policy to apply to this Array. Because we don't create another Policy, we must use the Default Policy (Figure 11). It is possible to create new Policies every time and associate this new Policy with an Array after installation. I will show you how to do this in another article on www.isaserver.org.

Figure 11: Select the ISA Server Enterprise Policy for the new Array
In the following picture you can select the types of Array Firewall Policy rules that can be created for this Array (Figure 12). This is a great option to limit the creation of rule type at Array level.

Figure 12: Select the types of Array Firewall Policy rules that can be created for this Array
After reading the summary of the new Array Wizard click Finish. ISA Server now creates the new Array. This task can be time consuming (Figure 13).

Figure 13: Creating the new Array
Click Apply (Figure 14) and you have successfully finished the new Array installation.

Figure 14: Click Apply to save the changes and update the configuration
As you know, ISA Server 2004 uses System Policies which allow some communications between ISA Server, Active Directory Servers, DNS Servers, DHCP and many more. You must modify the System Policy to allow the ISA Server 2004 Array Members to access the Configuration Storage Server. If you want to know more about System Policies, read Tom Shinders article "The ISA Firewall's Default Post Installation System Policy and Configuration" at the following website: http://www.isaserver.org/articles/2004systempolicy.html.
You can find these settings in the System Policy Editor under Configuration Storage Server – Local Configuration Storage Server Access. Click Enable (Figure 15).

Figure 15: Enable Remote Configuration Storage Server Access
Click From (Figure 15) in the System Policy Editor – select Managed ISA Server Computers and click Add to enter the names and IP-addresses from the two ISA Server 2004 Enterprise Array members.

Figure 16: Enter the name and IP-addresses for the Managed ISA Server Computers
Readmore...
Tuesday, 19 July 2016

Manage the Windows Server 2012 Firewall

0 comments
 
This article will detail how to perform the most common tasks with the windows firewall on Windows Server 2012. This includes managing the firewall settings and creating custom inbound and outbound firewall rules.

Manage firewall settings

The Windows Firewall with Advanced Security is a host-based firewall that runs on Windows Server 2012 and is turned on by default. Firewall settings within Windows Server 2012 are managed from within the Windows Firewall MMC (Microsoft Management Console). To review and set Firewall settings perform the following:
  1. Open the Server Manager from the task bar.
  2. In the right-hand side of the top navigation bar, click Tools and select Windows Firewall with Advanced Security.
  3. First review the current configuration settings by selecting Windows Firewall Properties from the MMC landing page. This allows access to modify the settings for each of the three firewall profiles, Domain, Private, and Public, as well as IPSec settings.

Applying Custom Rules

Custom Rules allow the finest level of control over inbound and outbound traffic to your Windows Server 2012.
  1. If you have not already done so, load the Windows Firewall MMC by opening the Server Manager from the task bar, clicking the Tools menu, and selecting Windows Firewall with Advanced Security.
  2. Select either Inbound Rules or Outbound Rules under Windows Firewall with Advanced Security on the left side of the management console.
    Note: This will provide a listing on each of the currently configured firewall rules. Rules that are currently enabled are denoted by green checkbox icon, while disabled rules display a grey checkbox icon. Right-clicking a rule will allow you toggle enable/disable.
  3. From the right side of either the Inbound Rules or Outbound Rules tab click New Rule.
    The new rule wizard launches.
  4. Select Custom from the Rule Type radial button and click Next.
  5. Select the Program association for the Custom Firewall Rule as either All programs or specify the path to a program and click Next.
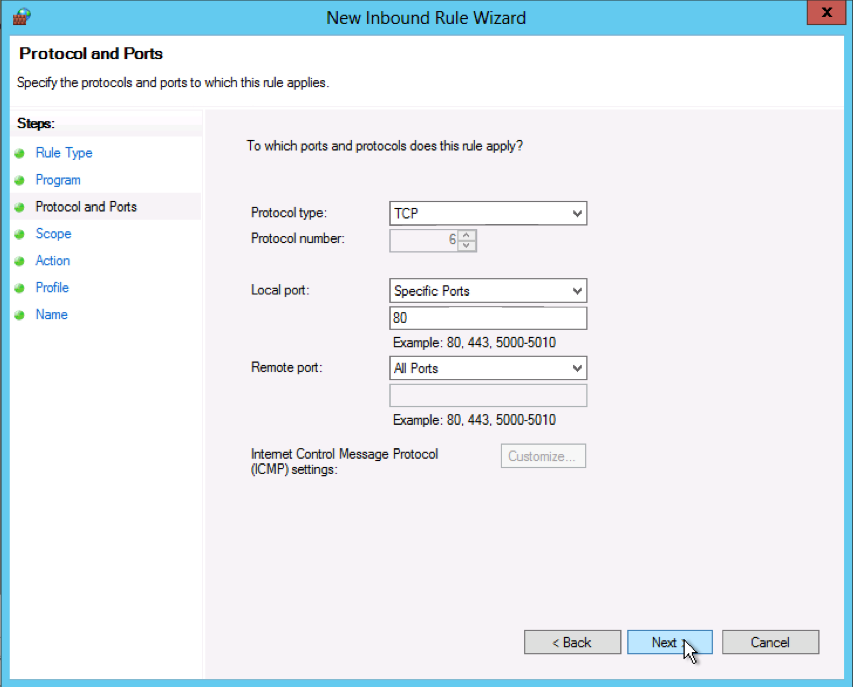
  6. From the Protocol type field select the protocol type and click Next.
    Note: This walkthrough uses TCP on port 80 (HTTP) for example purposes.

  7. Select an IP address association for both local and remote addresses and click Next.
  8. For traffic matching the IP address(es) you specified in the previous step, select whether to Allow the connection, Allow the connection if it is secure, or Block the connection and click Next.
    Note: If you choose to allow the connection if it is secure, you can customize this further by clicking Customize.
  9. Select which profiles you want to associate with the custom rule, Domain, Public, or Private, and click Next.
  10. Provide a name for your Firewall rule and an optional description and click Finish.
  11. After you finish creating the rule, it is automatically enabled.
The firewall rule can be found on the corresponding Rule tab, either inbound or outbound depending on the type created. To disable or delete the rule find the rule in the MMC, right-click it, and select either Disable Rule or Delet
Readmore...

Windows Firewall: Windows Server 2012 / Server 2012 R2

0 comments
 
In continuation of our Windows Server 2012 and Windows Server 2012 R2 series, we will be discussing firewalls and some of the new features made available in the latest version of Windows Firewall.  While a firewall makes for a great defensive measure against malicious network traffic, it can cause problems for applications that rely on network connectivity.  As this is true for many Blackbaud applications, we will be covering some of the common Blackbaud product specific issues that involve firewall configurations and how to remedy them.
What is a Firewall? 
A firewall is a piece of software or hardware device that is used to protect a network and nodes connected to that network from external (as well as internal)threats.  The basic functionality of a firewall is to drop (or block)network packets that do not correspond with allowed traffic configured on the firewall by a network administrator.  While this article focuses mainly on the interaction between Blackbaud products and the Windows Firewall, it is worth noting the distinction between a network firewall and a host-based (software) firewall.  While both types of firewalls are used to protect systems, they are implemented differently.  For instance, in a host-based firewall (ex. Windows Firewall), the firewall is a component that isinstalled to the operating system.  While a network firewall (typically a hardware appliance) sits between your internal and external network and is used to protect the all assets that are part of the Local Area Network (LAN).
What is the Windows Firewall?
The Windows Firewall is a host-based, stateful firewall that is built right into the Windows operating system.  The first implementation of the Windows Firewall was in Windows XP Service Pack 2 and included features such as security logging, program and port exceptions, and ICMP transmission rules.  While the initial feature-set was sufficient at the time, the Windows Firewall has grown into a more robust security tool.  With newer iterations of the Windows Firewall not only has Microsoft greatly improved the granularity of protection rules, but they have also implemented new features such as IPSec protection settings and extended PowerShell integration.
What’s new for Windows Firewall in Windows Server 2012 and Windows Server 2012 R2?
Windows Server 2012 and Windows Server 2012 R2, while offering a very similar Windows Firewall experience as previous iterations, has improved in the following ways:
1. Windows Store app network isolation – Previously, you could only enforce security rules based on programs or ports.  With Windows Server 2012 and Windows Server 2012 R2, you can now configure security rules for isolating Windows Store apps.  For example, if you wish to only allow a Windows App to access the local network and not connect to the Internet, this is now possible.  For more information regarding this new feature
2. PowerShell cmdlets – With new, extensive cmdlets, you can now completely configure your Firewall policy from the Windows PowerShell environment.  Remote management of firewall rules is also now possible with Windows Remote Management (WinRM)which is enabled in Windows Server 2012 by default.  For more information regarding the new PowerShell commands, please see the following Microsoft article:
3. Internet Key Exchange version 2 (IKEv2) for IPsec transport mode – IKEv2 support has been improved upon and now supports features such as IPsec end-to-end transport mode connections. For more information regarding the changes to IKEv2 support, please visit the following Microsoft article:

SQL Server and Windows Firewall Exceptions
In Windows Server 2012 and Windows Server 2012 R2, the Windows Firewall is enabled for all network interfaces and for all network location types by default (for more information regarding Network Location Awareness.  While the Windows Firewall can be disabled, it may not be the best decision to make from a security standpoint (depending on your organization).  However, some organizations rely on third party firewall solutions and have no practical use for the Windows Firewall.   For those that do use the Windows Firewall, it would be best to configure exception rules to only allow specific programs or ports and block any unsolicited network traffic.
For example, a common issue customers bring to our attention in Support is SQL Server connectivity.
When logging into The Raiser’s Edge, you may receive one of the following errors:
  • “Error: Unable to establish database connection. [Microsoft][ODBC SQL Server Driver][DBNETLIB]SQL Server does not exist or access denied. Native error: 17 [Microsoft][ODBC SQL Server Driver][DBNETLIB]ConnectionOpen (Connect()). Native error: 53”.
  • “Error: Unable to connect to SQL Server. Please check BB140810”
When logging into The Financial Edge / Education Edge, you may receive a similar error:
  • “Error: Unable to establish database connection. Please refer to the Knowledge Base article BB140810
The frequent cause of these errors is due to the firewall configuration between workstations and the server, especially if the error occurs on a brand new server installation.   In order for The Raiser’s Edge or The Financial Edge / Education Edge to communicate with SQL Server it needs to be able to make a connection using the Open Database Connectivity (ODBC) driver.  If the Windows Firewall on the server is configured to block the SQL ports your server is listening on, then none of the workstations will be able to connect to your database.
To resolve this issue, the appropriate TCP and UDP port exceptions for SQL Server need to be made in the firewall.  By default, SQL Server communicates using TCP port 1433.  SQL Server also uses UDP port 1434 for automatic discovery of SQL Server by workstations.  However, your SQL Server may be configured to use a different SQL Server connectivity port.  To check which port SQL Server is using for database connectivity, please follow the Knowledgebase article:
How to find the port being used by SQL Server (includes video) (BB134012)
Once you have determined the proper SQL Server connectivity port, you will need to add this port and UDP port 1434 to the Windows Firewall exceptions.  As the configuration steps are the same for Windows Firewall in Windows Server 2012 and Windows Server 2012 R2 they were in Windows Server 2008 R2, please follow the steps laid out by Microsoft to allow SQL Server access through the Windows Firewall:
How do I configure my the Windows Firewall for use with Mobile Service for The Raiser’s Edge or The Raiser’s Edge ManagementEvent App? 
The Raiser’s Edge mobile applications may also require configuration changes to your Windows firewall or network firewall.  Some of our products, such as Mobile Service for The Raiser’s Edge and The Raiser’s Edge Event ManagementApp in particular, require access to the Windows Azure Service Bus in order to communicate between the Raiser’s Edge database and external devices.
While both of these applications work independently from one another, they both utilize the Windows Azure Bus in order to communicate with external devices.  Windows Azure is a Microsoft-provided Platform as a Service that we use to securely pass data between your database and the applicable device.  Windows Azure works as an encrypted tunnel, utilizing 128-bit encryption to transfer information.   For more information regarding Windows Azure,
To better demonstrate how both applications connect to The Raiser’s Edge database utilizing Windows Azure please see the following diagram:
Server201212.10blogpic1


A typical error you may see when attempting to log in to The Raiser’s Edge Mobile application is:
“Error: Cannot open database “[Database Name]” requested by the login. The login failed”
In order to make this connection possible with the Windows firewall enabled (as well as a network firewall), you will need to configure exceptions outbound for TCP ports 443 and ports 9350 through 9354 (for Windows Azure).
While the process for allowing ports through the Windows Firewall was covered in a previous section, the procedure for allowing these ports through your network firewall will vary based on vendor.   It is best to consult your network administrator or vendor regarding this process.  For more information regarding The Raiser’s Edge Event Management App and Mobile Service for The Raiser’s Edge, please see the following Blackbaud Knowledgebase articles:
What ports need to be opened in a firewall(s) for RE mobile or the RE Event app to work? (BB736217)
Is data encrypted in RE: Mobile? (BB736621)
Conclusion
While we are unable to cover all scenarios involving a network firewall or Windows Firewall, please check out our knowledgebase for more information regarding firewall configurations for your product.    Also, if you have any questions regarding the topics discussed in this article, please leave a comment below and we will be glad to follow up!
Readmore...

How to enable Roaming Profiles on Windows Server 2012 R2

0 comments
 
Roaming Profiles allow users of an Active Directory Domain to access their desktop and documents from any PC of the domain.
It’s a powerful feature that can improve the productivity of the employees and make their lives easier.
The best thing about Roaming Profiles is how they are easy to set up.

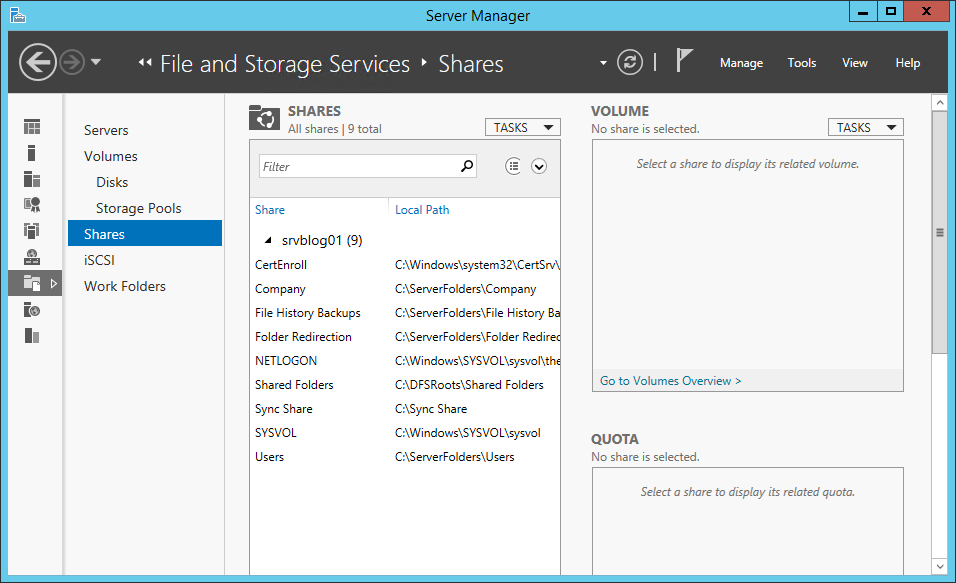
Before configuring a Roaming Profile, we need to create a Share. Open the Server Manager and go to the Shares tab:
How to enable Roaming Profiles on Windows Server 2012 R2
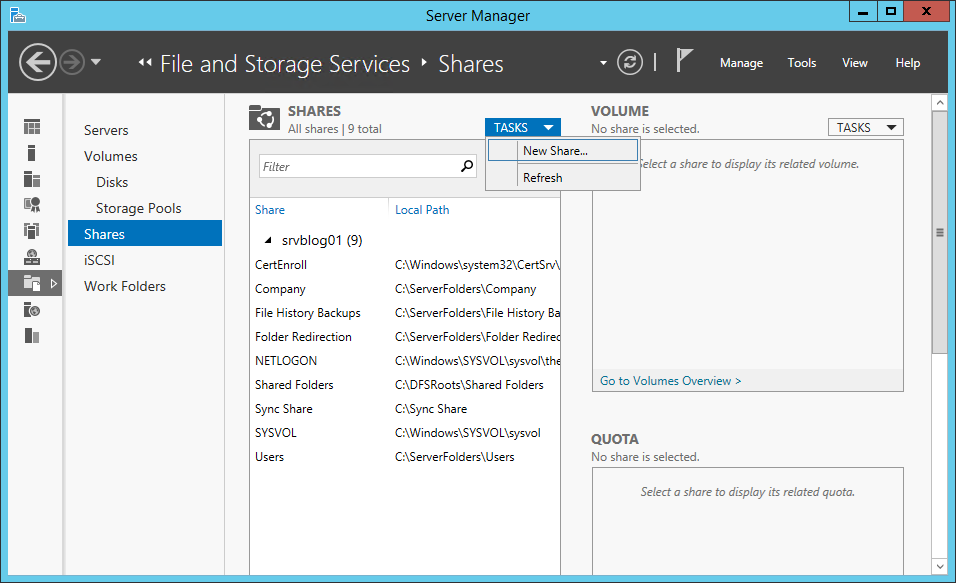
Create a new Share:
How to enable Roaming Profiles on Windows Server 2012 R2
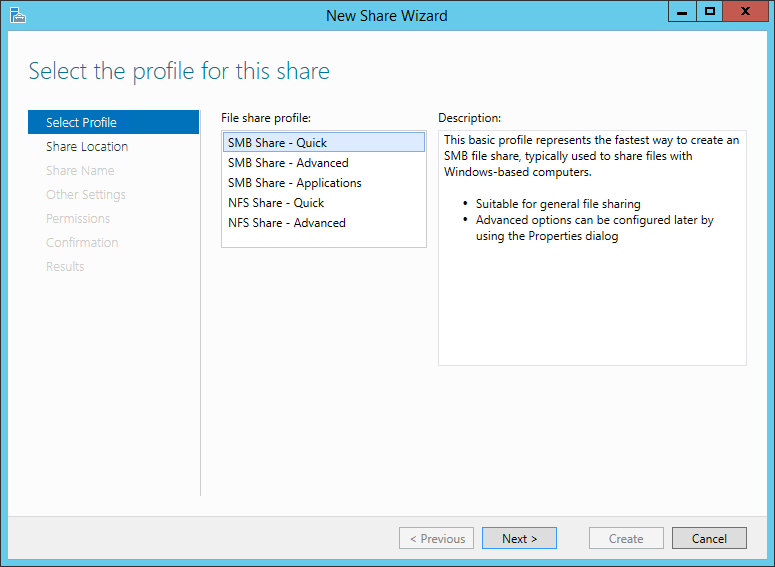
Click Next:
How to enable Roaming Profiles on Windows Server 2012 R2
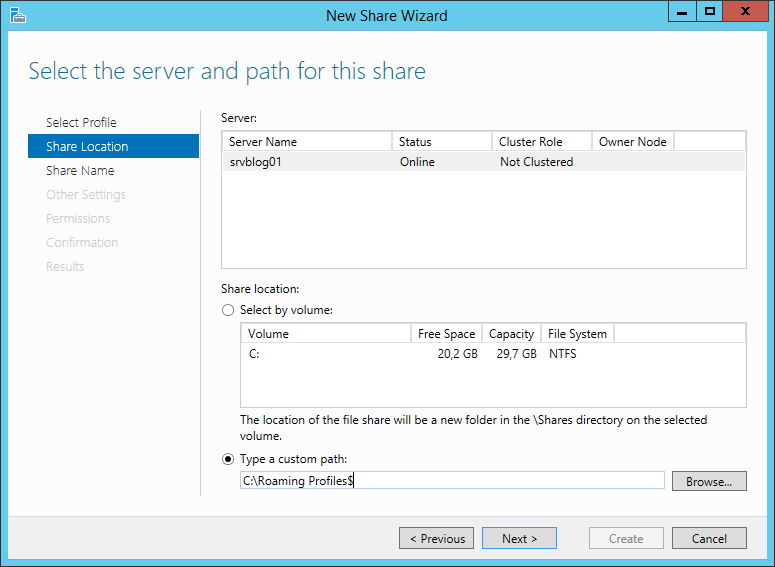
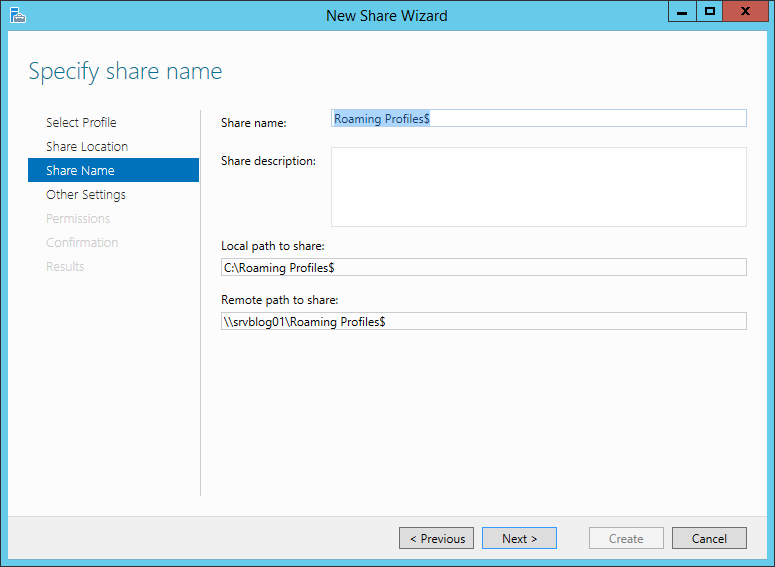
Specify the path of the Roaming Profiles. Add a $ to the end of the path to make the shared folder invisible:
How to enable Roaming Profiles on Windows Server 2012 R2
Click Next:
How to enable Roaming Profiles on Windows Server 2012 R2
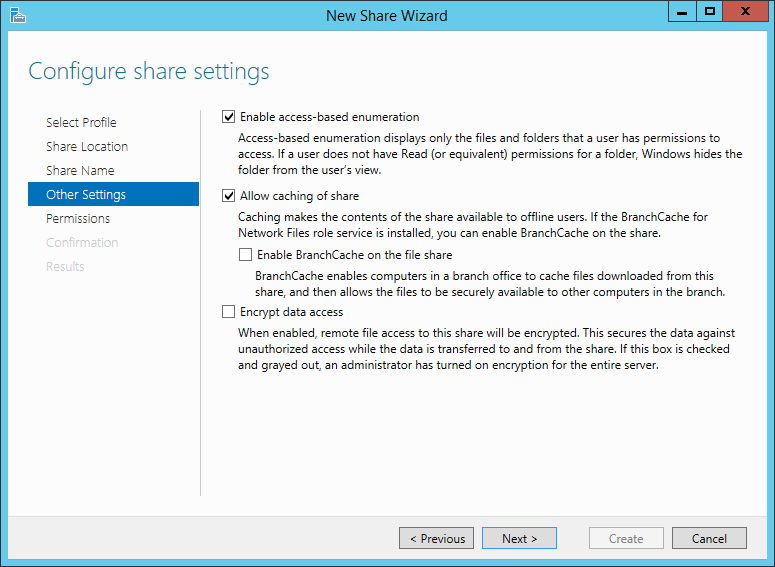
Enable access-based Enumeration (for better security):
How to enable Roaming Profiles on Windows Server 2012 R2
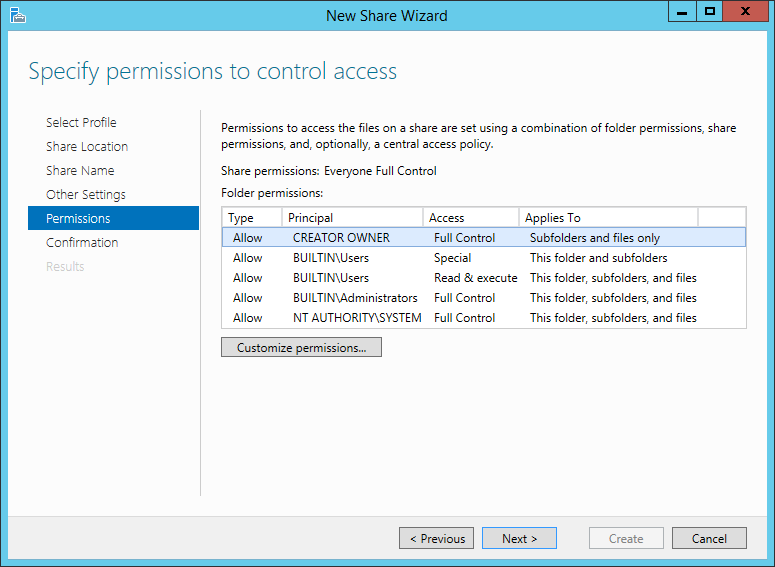
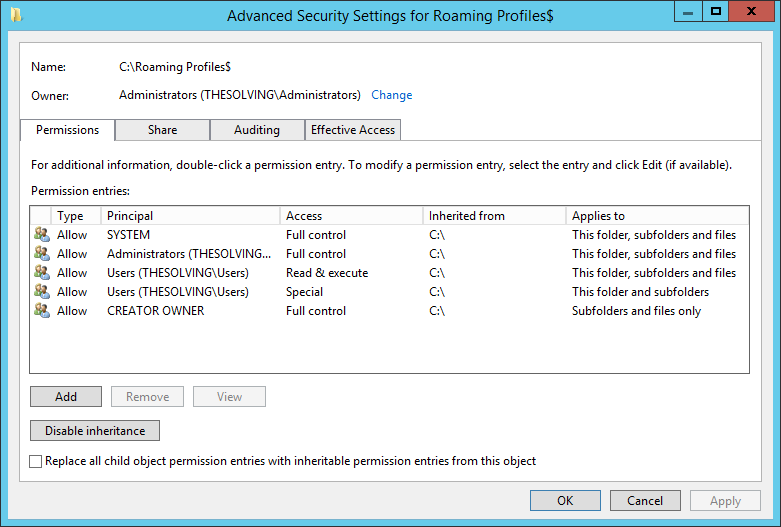
Now it’s time to customize the permissions. We need to allow the access to Domain Users (or another Group). Click Customize permissions:
How to enable Roaming Profiles on Windows Server 2012 R2
Click Add:
How to enable Roaming Profiles on Windows Server 2012 R2
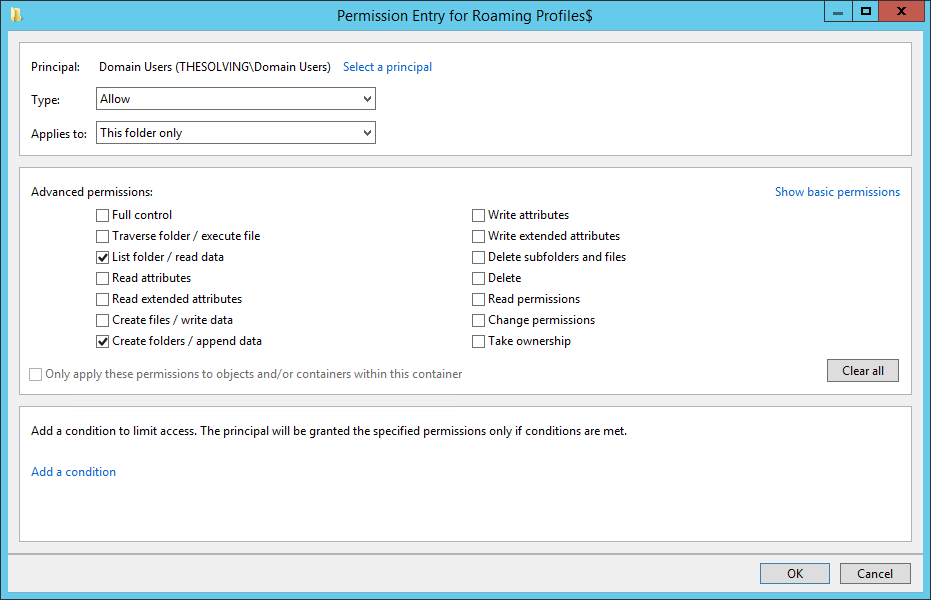
Select the group (Domain Users in our example) and apply the permissions to This folder only. You need to enable List folders / read data and Create folders / append data:
How to enable Roaming Profiles on Windows Server 2012 R2
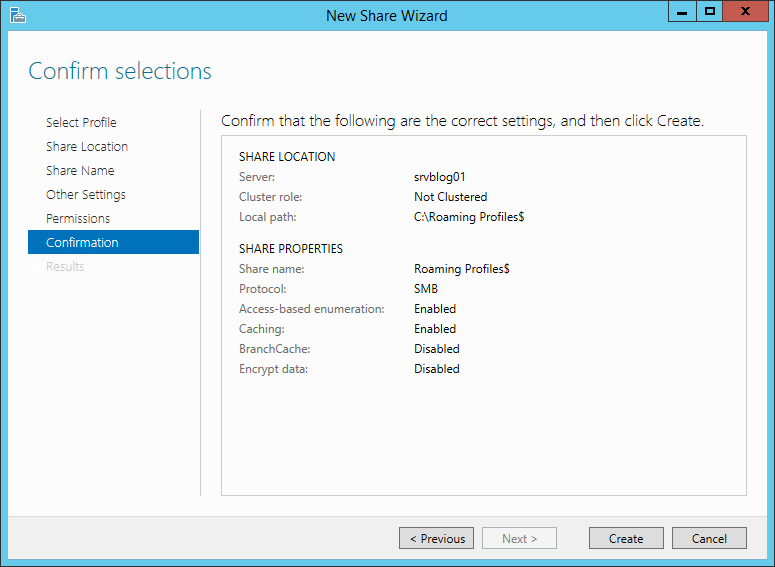
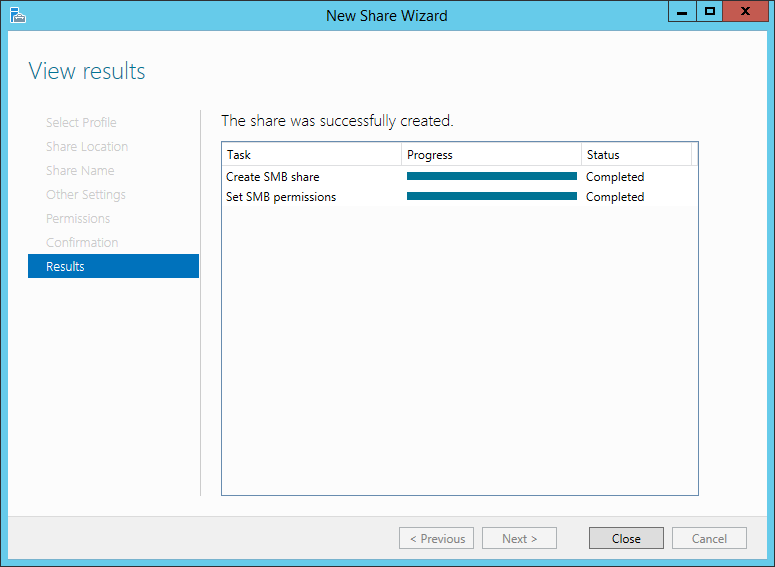
Confirm and the share will be created:
How to enable Roaming Profiles on Windows Server 2012 R2
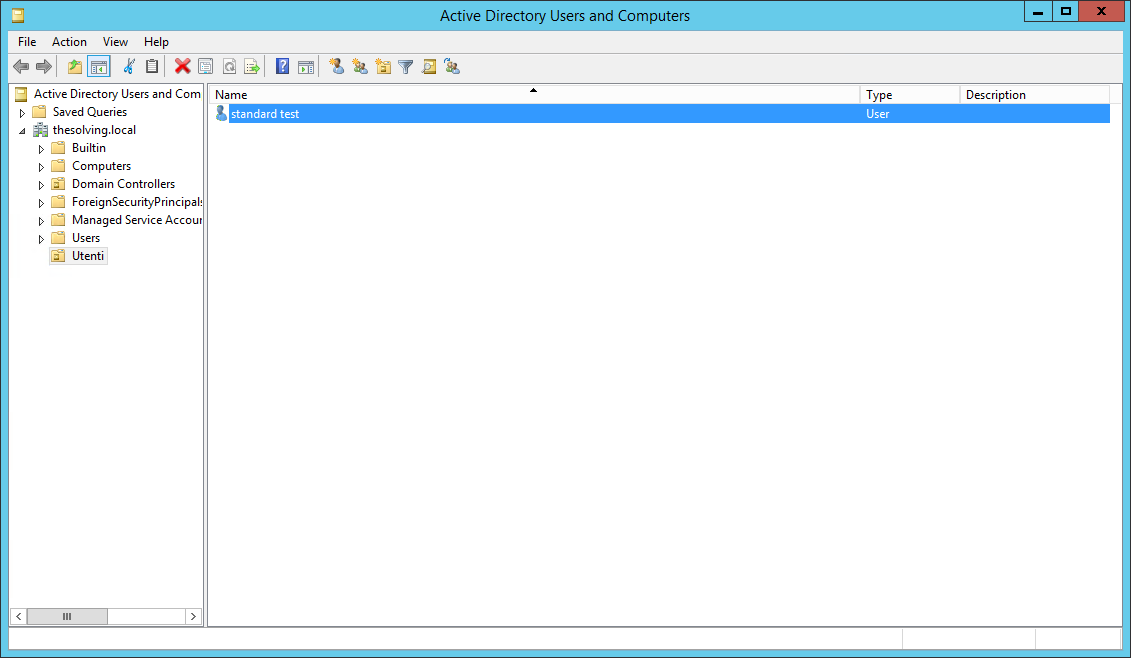
Now the final step. Open the Active Directory Users and Computers panel:
How to enable Roaming Profiles on Windows Server 2012 R2
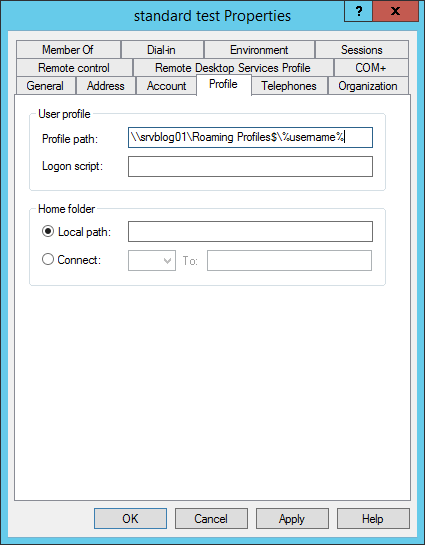
Open the Properties of a user and go to the Profile tab. Specify the Profile Path: \\server_name\profile_folder_name\%username%
How to enable Roaming Profiles on Windows Server 2012 R2
Mission accomplished! Your first Roaming Profile is enabled and active. To create other Roaming Profiles use the copy functionalities or manually specify the Profile Path.
You can also create a policy to automate the process.
Readmore...