
The basics for any network based on *nix hosts is the Transport Control
Protocol/ Internet Protocol (TCP/IP) combination of three protocols.
This combination consists of the Internet Protocol (IP),Transport
Control Protocol (TCP), and Universal Datagram Protocol (UDP).
By Default most of the users configure their network card during the installation of Ubuntu. You can however, use the ifconfig command at the shell prompt or Ubuntu's graphical network configuration tools, such as network-admin, to edit your system's network device information or to add or remove network devices on your system
Configuring Network Using Graphical Configuration Tool in Ubuntu
If you are new to networking the graphical configuration tool is your best method for configuring new hardware in Ubuntu.We are going to use GUI tool "network-admin" to configure networking. Remember, you must be root to run network-admin.
There are two ways to start network-admin first thing is you can use your terminal to type "sudo network-admin" it will start up or you can go to System--->Administration --->Networking
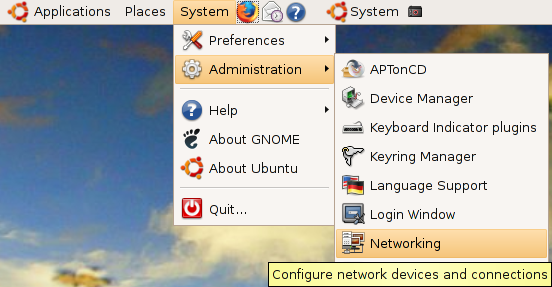
Once it opens you should see the following screen
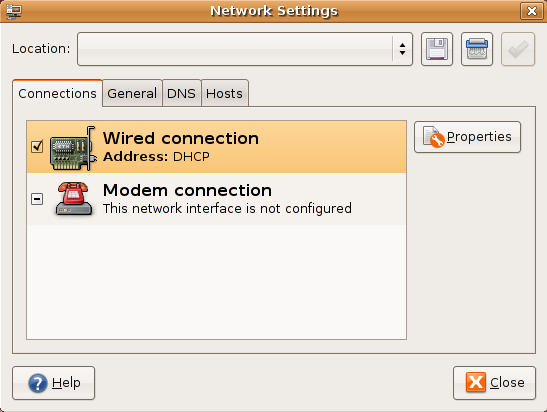
In the above screen select wired connection and click on properties tab you should see the following screen my network card is curretly configured for DHCP client and you need to make sure "Enable this connection" tick box is checked

If you want to configure the Static ipaddress you need to select drop down box under "Configuration" select static ip address and you need to make sure "Enable this connection" tick box is checked

Once you select the static ip address you need to select ip address,subnet mask,gateway address and click on ok

Now you click on "General" tab here you can enter your hostname,domain name

Next one you need to click on "DNS" tab to configure your system's DNS settings, hostname, or DNS search path.

Click the Hosts tab, and then either click the Add or Properties button (after selecting a host) to create or edit an entry in your system's /etc/hosts file

Highlight an existing entry, and then click the Properties button to change /etc/hosts entries in the Hosts tab of the Network Configuration screen.

You can also assign different locations to your computer, especially very useful if you are on a laptop and move between several networks each requiring different configurations. Just select the gray bar at the top of the network-admin window and select Create Location. Enter a name, such as Home and then repeat this again to create another location, Work. Each time you switch between locations, Ubuntu detects that it needs to use configurations specific to those locations, so for instance you might want to use DHCP at work, but not at home. Simple; just select the Home location, configure your ethernet connection to use a Static IP and you are all set to switch between your home and corporate networks.
By Default most of the users configure their network card during the installation of Ubuntu. You can however, use the ifconfig command at the shell prompt or Ubuntu's graphical network configuration tools, such as network-admin, to edit your system's network device information or to add or remove network devices on your system
Configuring Network Using Graphical Configuration Tool in Ubuntu
If you are new to networking the graphical configuration tool is your best method for configuring new hardware in Ubuntu.We are going to use GUI tool "network-admin" to configure networking. Remember, you must be root to run network-admin.
There are two ways to start network-admin first thing is you can use your terminal to type "sudo network-admin" it will start up or you can go to System--->Administration --->Networking
Once it opens you should see the following screen
In the above screen select wired connection and click on properties tab you should see the following screen my network card is curretly configured for DHCP client and you need to make sure "Enable this connection" tick box is checked
If you want to configure the Static ipaddress you need to select drop down box under "Configuration" select static ip address and you need to make sure "Enable this connection" tick box is checked
Once you select the static ip address you need to select ip address,subnet mask,gateway address and click on ok
Now you click on "General" tab here you can enter your hostname,domain name
Next one you need to click on "DNS" tab to configure your system's DNS settings, hostname, or DNS search path.
Click the Hosts tab, and then either click the Add or Properties button (after selecting a host) to create or edit an entry in your system's /etc/hosts file
Highlight an existing entry, and then click the Properties button to change /etc/hosts entries in the Hosts tab of the Network Configuration screen.
You can also assign different locations to your computer, especially very useful if you are on a laptop and move between several networks each requiring different configurations. Just select the gray bar at the top of the network-admin window and select Create Location. Enter a name, such as Home and then repeat this again to create another location, Work. Each time you switch between locations, Ubuntu detects that it needs to use configurations specific to those locations, so for instance you might want to use DHCP at work, but not at home. Simple; just select the Home location, configure your ethernet connection to use a Static IP and you are all set to switch between your home and corporate networks.
 Subscribe to email feed


