
If you are new to networking the graphical configuration tool is your
best method for configuring new hardware in Ubuntu.We are going to use
GUI tool "network-admin" to configure networking. Remember, you must be
root to run network-admin.
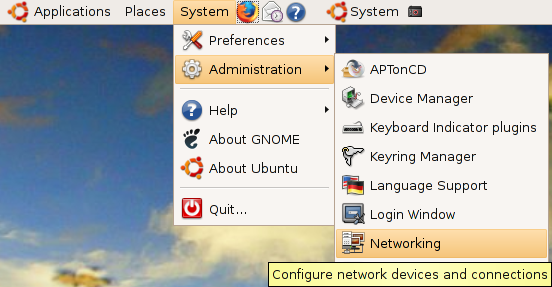
There are two ways to start network-admin first thing is you can use your terminal to type "sudo network-admin" it will start up or you can go to System--->Administration --->Networking
Once it opens you should see the following screen
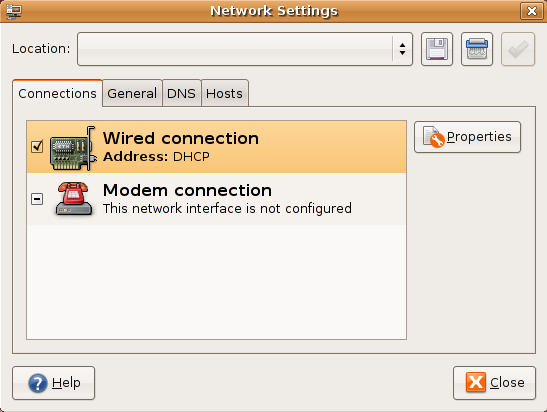
In the above screen select wired connection and click on properties tab you should see the following screen my network card is curretly configured for DHCP client and you need to make sure "Enable this connection" tick box is checked

If you want to configure the Static ipaddress you need to select drop down box under "Configuration" select static ip address and you need to make sure "Enable this connection" tick box is checked

Once you select the static ip address you need to select ip address,subnet mask,gateway address and click on ok

Now you click on "General" tab here you can enter your hostname,domain name

Next one you need to click on "DNS" tab to configure your system's DNS settings, hostname, or DNS search path.

Click the Hosts tab, and then either click the Add or Properties button (after selecting a host) to create or edit an entry in your system's /etc/hosts file

Highlight an existing entry, and then click the Properties button to change /etc/hosts entries in the Hosts tab of the Network Configuration screen.

You can also assign different locations to your computer, especially very useful if you are on a laptop and move between several networks each requiring different configurations. Just select the gray bar at the top of the network-admin window and select Create Location. Enter a name, such as Home and then repeat this again to create another location, Work. Each time you switch between locations, Ubuntu detects that it needs to use configurations specific to those locations, so for instance you might want to use DHCP at work, but not at home. Simple; just select the Home location, configure your ethernet connection to use a Static IP and you are all set to switch between your home and corporate networks.
Configure Network Interface Using Command-Line
You can configure a network interface from the command line using the networking utilities. You configure your network client hosts with the command line by using commands to change your current settings or by editing a number of system files.
Configuring DHCP address for your network card
If you want to configure DHCP address you need to edit the /etc/network/interfaces and you need to enter the following lines replace eth0 with your network interface card
sudo vi /etc/network/interfaces
# The primary network interface -- use DHCP to find our address
auto eth0
iface eth0 inet dhcp
Configuring Static IP address for your network card
If you want to configure Static IP address you need to edit the /etc/network/interfaces and you need to enter the following lines replace eth0 with your network interface card
sudo vi /etc/network/interfaces
# The primary network interface
auto eth0
iface eth0 inet static
address 192.168.3.90
gateway 192.168.3.1
netmask 255.255.255.0
network 192.168.3.0
broadcast 192.168.3.255
After entering all the details you need to restart networking services using the following command
sudo /etc/init.d/networking restart
Setting up Second IP address or Virtual IP address in Ubuntu
If you are a server system administrator or normal user some time you need to assign a second ipaddress to your Ubuntu machine.For this you need to edit the /etc/network/interfaces file and you need to add the following syntax.Below one is the only example you need to chnage according to your ip address settings
sudo vi /etc/network/interfaces
auto eth0:1
iface eth0:1 inet static
address 192.168.1.60
netmask 255.255.255.0
network x.x.x.x
broadcast x.x.x.x
gateway x.x.x.x
You need to enter all the details like address,netmask,network,broadcast and gateways values after entering all the values save this file and you need to restart networking services in debian using the following command to take effect of our new ipaddress.
After entering all the details you need to restart networking services using the following command
sudo /etc/init.d/networking restart
Setting your ubuntu stytem hostname
Setting up your hostname upon a ubuntu installation is very straightforward. You can directly query, or set, the hostname with the hostname command.
As an user you can see your current hostname with
sudo /bin/hostname
Example
To set the hostname directly you can become root and run
sudo /bin/hostname newname
When your system boots it will automatically read the hostname from the file /etc/hostname
If you want to know more about how to setup host name check here
Setting up DNS
When it comes to DNS setup Ubuntu doesn't differ from other distributions. You can add hostname and IP addresses to the file /etc/hosts for static lookups.
To cause your machine to consult with a particular server for name lookups you simply add their addresses to /etc/resolv.conf.
For example a machine which should perform lookups from the DNS server at IP address 192.168.3.2 would have a resolv.conf file looking like this
sudo vi /etc/resolv.conf
enter the following details
search test.com
nameserver 192.168.3.2
Network Troubleshooting Tips
Networking is sometimes considered to be complex, and hard to troubleshoot and manage. However, Linux provides you with Some tools to figure out exactly what's going wrong on your network, and how to fix it.Here we are going see some tools and how to check the network connectivity.
Ping
Ping is a computer network tool used to test whether a particular host is reachable across an IP network. Ping works by sending ICMP “echo request” packets to the target host and listening for ICMP “echo response” replies (sometimes dubbed "Pong!" as an analog from the Ping Pong table tennis sport.) Using interval timing and response rate, ping estimates the round-trip time (generally in milliseconds although the unit is often omitted) and packet loss (if any) rate between hosts.
This is very basic and powerful tool to check Internet connection
Example
ping -c 4 google.com
-c option is used to pass how many packets you're sending
If everything working file you should get reply looks like below
Pinging www.l.google.com [64.233.183.103] with 32 bytes of data:
Reply from 64.233.183.103: bytes=32 time=12ms TTL=244
Reply from 64.233.183.103: bytes=32 time=12ms TTL=244
Reply from 64.233.183.103: bytes=32 time=12ms TTL=244
Reply from 64.233.183.103: bytes=32 time=12ms TTL=244
Ping statistics for 64.233.183.103:
Packets: Sent = 4, Received = 4, Lost = 0 (0% loss),
Approximate round trip times in milli-seconds:
Minimum = 12ms, Maximum = 12ms, Average = 12ms
Traceroute
traceroute is a computer network tool used to determine the route taken by packets across an IP network. An IPv6 variant, traceroute6, is also widely available.Very useful to trace IP packets.
Example
traceroute google.com
ifconfig
The Unix command ifconfig can function as a tool to configure a network interface for TCP/IP from the command line interface (CLI).This is another easy tool to see if your interface is actually loading correctly.
Example
ifconfig
eth0 Link encap:Ethernet HWaddr 00:0A:E6:C6:07:85
inet addr:132.18.0.16 Bcast:132.18.0.255 Mask:255.255.255.0
inet6 addr: fe80::20a:e6ff:fec6:785/64 Scope:Link
UP BROADCAST RUNNING MULTICAST MTU:1500 Metric:1
RX packets:18458 errors:0 dropped:0 overruns:0 frame:0
TX packets:8982 errors:0 dropped:0 overruns:0 carrier:0
collisions:0 txqueuelen:1000
RX bytes:4015093 (3.8 MiB) TX bytes:1449812 (1.3 MiB)
Interrupt:10 Base address:0xd400
Route
This is very useful to check routing config
Example
route -n
Netstat
If you want to see Routing Tables,all open ports,all listen ports
netstat -nr
-n means return numeric output (ie, IP address instead of hostname)
-r means print the routing table
find all open ports
netstat -a
find listening ports
netstat -l
There are two ways to start network-admin first thing is you can use your terminal to type "sudo network-admin" it will start up or you can go to System--->Administration --->Networking
Once it opens you should see the following screen
In the above screen select wired connection and click on properties tab you should see the following screen my network card is curretly configured for DHCP client and you need to make sure "Enable this connection" tick box is checked
If you want to configure the Static ipaddress you need to select drop down box under "Configuration" select static ip address and you need to make sure "Enable this connection" tick box is checked
Once you select the static ip address you need to select ip address,subnet mask,gateway address and click on ok
Now you click on "General" tab here you can enter your hostname,domain name
Next one you need to click on "DNS" tab to configure your system's DNS settings, hostname, or DNS search path.
Click the Hosts tab, and then either click the Add or Properties button (after selecting a host) to create or edit an entry in your system's /etc/hosts file
Highlight an existing entry, and then click the Properties button to change /etc/hosts entries in the Hosts tab of the Network Configuration screen.
You can also assign different locations to your computer, especially very useful if you are on a laptop and move between several networks each requiring different configurations. Just select the gray bar at the top of the network-admin window and select Create Location. Enter a name, such as Home and then repeat this again to create another location, Work. Each time you switch between locations, Ubuntu detects that it needs to use configurations specific to those locations, so for instance you might want to use DHCP at work, but not at home. Simple; just select the Home location, configure your ethernet connection to use a Static IP and you are all set to switch between your home and corporate networks.
Configure Network Interface Using Command-Line
You can configure a network interface from the command line using the networking utilities. You configure your network client hosts with the command line by using commands to change your current settings or by editing a number of system files.
Configuring DHCP address for your network card
If you want to configure DHCP address you need to edit the /etc/network/interfaces and you need to enter the following lines replace eth0 with your network interface card
sudo vi /etc/network/interfaces
# The primary network interface -- use DHCP to find our address
auto eth0
iface eth0 inet dhcp
Configuring Static IP address for your network card
If you want to configure Static IP address you need to edit the /etc/network/interfaces and you need to enter the following lines replace eth0 with your network interface card
sudo vi /etc/network/interfaces
# The primary network interface
auto eth0
iface eth0 inet static
address 192.168.3.90
gateway 192.168.3.1
netmask 255.255.255.0
network 192.168.3.0
broadcast 192.168.3.255
After entering all the details you need to restart networking services using the following command
sudo /etc/init.d/networking restart
Setting up Second IP address or Virtual IP address in Ubuntu
If you are a server system administrator or normal user some time you need to assign a second ipaddress to your Ubuntu machine.For this you need to edit the /etc/network/interfaces file and you need to add the following syntax.Below one is the only example you need to chnage according to your ip address settings
sudo vi /etc/network/interfaces
auto eth0:1
iface eth0:1 inet static
address 192.168.1.60
netmask 255.255.255.0
network x.x.x.x
broadcast x.x.x.x
gateway x.x.x.x
You need to enter all the details like address,netmask,network,broadcast and gateways values after entering all the values save this file and you need to restart networking services in debian using the following command to take effect of our new ipaddress.
After entering all the details you need to restart networking services using the following command
sudo /etc/init.d/networking restart
Setting your ubuntu stytem hostname
Setting up your hostname upon a ubuntu installation is very straightforward. You can directly query, or set, the hostname with the hostname command.
As an user you can see your current hostname with
sudo /bin/hostname
Example
To set the hostname directly you can become root and run
sudo /bin/hostname newname
When your system boots it will automatically read the hostname from the file /etc/hostname
If you want to know more about how to setup host name check here
Setting up DNS
When it comes to DNS setup Ubuntu doesn't differ from other distributions. You can add hostname and IP addresses to the file /etc/hosts for static lookups.
To cause your machine to consult with a particular server for name lookups you simply add their addresses to /etc/resolv.conf.
For example a machine which should perform lookups from the DNS server at IP address 192.168.3.2 would have a resolv.conf file looking like this
sudo vi /etc/resolv.conf
enter the following details
search test.com
nameserver 192.168.3.2
Network Troubleshooting Tips
Networking is sometimes considered to be complex, and hard to troubleshoot and manage. However, Linux provides you with Some tools to figure out exactly what's going wrong on your network, and how to fix it.Here we are going see some tools and how to check the network connectivity.
Ping
Ping is a computer network tool used to test whether a particular host is reachable across an IP network. Ping works by sending ICMP “echo request” packets to the target host and listening for ICMP “echo response” replies (sometimes dubbed "Pong!" as an analog from the Ping Pong table tennis sport.) Using interval timing and response rate, ping estimates the round-trip time (generally in milliseconds although the unit is often omitted) and packet loss (if any) rate between hosts.
This is very basic and powerful tool to check Internet connection
Example
ping -c 4 google.com
-c option is used to pass how many packets you're sending
If everything working file you should get reply looks like below
Pinging www.l.google.com [64.233.183.103] with 32 bytes of data:
Reply from 64.233.183.103: bytes=32 time=12ms TTL=244
Reply from 64.233.183.103: bytes=32 time=12ms TTL=244
Reply from 64.233.183.103: bytes=32 time=12ms TTL=244
Reply from 64.233.183.103: bytes=32 time=12ms TTL=244
Ping statistics for 64.233.183.103:
Packets: Sent = 4, Received = 4, Lost = 0 (0% loss),
Approximate round trip times in milli-seconds:
Minimum = 12ms, Maximum = 12ms, Average = 12ms
Traceroute
traceroute is a computer network tool used to determine the route taken by packets across an IP network. An IPv6 variant, traceroute6, is also widely available.Very useful to trace IP packets.
Example
traceroute google.com
ifconfig
The Unix command ifconfig can function as a tool to configure a network interface for TCP/IP from the command line interface (CLI).This is another easy tool to see if your interface is actually loading correctly.
Example
ifconfig
eth0 Link encap:Ethernet HWaddr 00:0A:E6:C6:07:85
inet addr:132.18.0.16 Bcast:132.18.0.255 Mask:255.255.255.0
inet6 addr: fe80::20a:e6ff:fec6:785/64 Scope:Link
UP BROADCAST RUNNING MULTICAST MTU:1500 Metric:1
RX packets:18458 errors:0 dropped:0 overruns:0 frame:0
TX packets:8982 errors:0 dropped:0 overruns:0 carrier:0
collisions:0 txqueuelen:1000
RX bytes:4015093 (3.8 MiB) TX bytes:1449812 (1.3 MiB)
Interrupt:10 Base address:0xd400
Route
This is very useful to check routing config
Example
route -n
Netstat
If you want to see Routing Tables,all open ports,all listen ports
netstat -nr
-n means return numeric output (ie, IP address instead of hostname)
-r means print the routing table
find all open ports
netstat -a
find listening ports
netstat -l
 Subscribe to email feed


